The process of creating an online store through the NEXT BASKET platform in several basic steps
- Enter your Credentials
- Enter your Store Name
- Choose a Theme
- Creating Product Categories
- Updating an Existing Category
- Configuring SEO for a category
- Creating Products
- Adding Attributes to a Product
- Design of your online store
- Apps section
- Online store settings
- Configuring payments
- Shipping methods
- Managing Roles in your online store
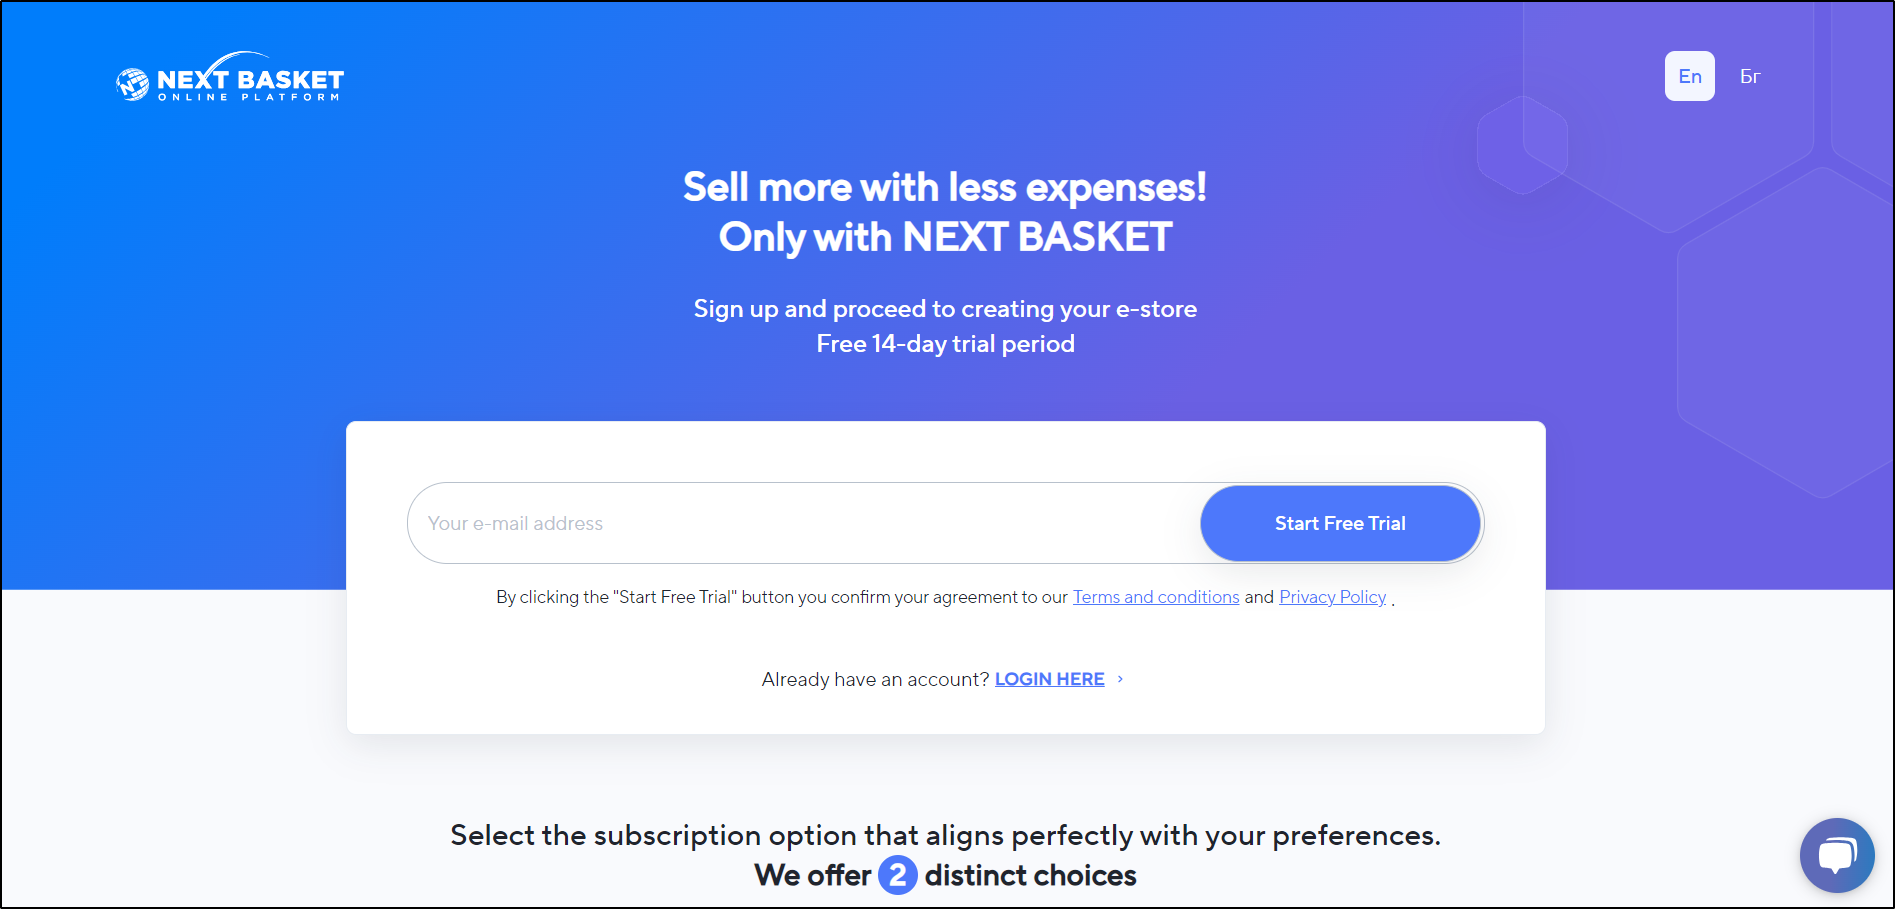
Step 1: Enter Your Credentials
Here, you can create your personal profile, necessary to create and start an online store. On this registration page, enter a valid email address. Hit Start Free Trial.
Starting the registration process:
Step 2: Enter Your Store Name
1. Fill in your store name. The name you enter will become part of the subdomain of your store's URL. For example, if you choose "sports clothes," the URL will be sports-clothes.nextbasket.shop. You can use only letters, numbers, and hyphens. Beneath the text field for the store name, you will see how your store's URL will appear.
2. Select the store's language.
3. Select the store's currency.
*Choose a business line (optional) and/or skip.
4. Hit "Proceed" to continue to the next step.

Step 3: Choose a Theme
This page presents a variety of freely available themes.
1. Choose a theme: browse the available themes and select the one that best suits your products.
Confirm your choice by clicking Select.
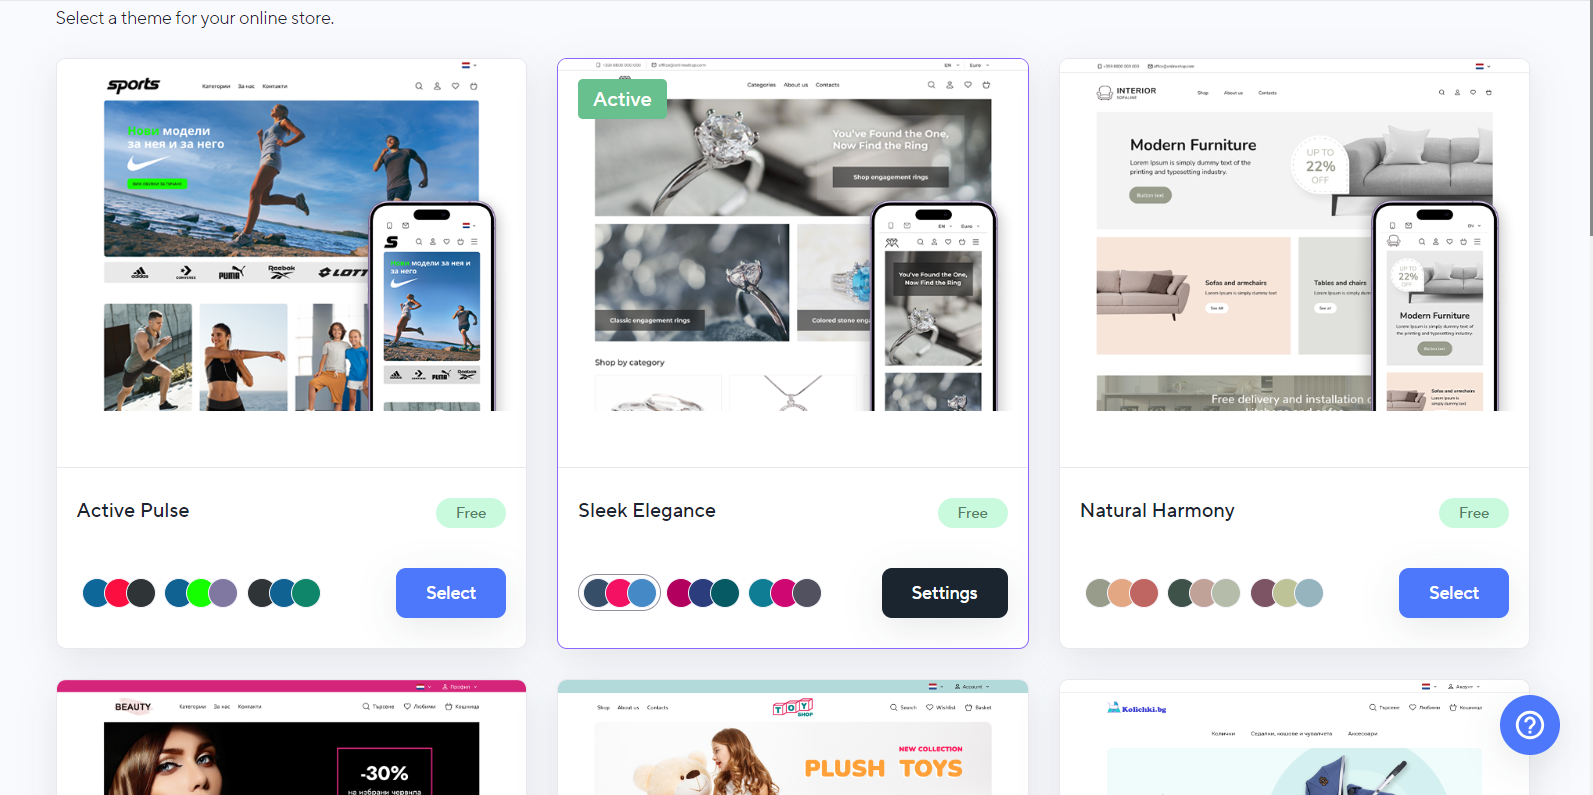
2. Select a color scheme and confirm by clicking Select Theme.
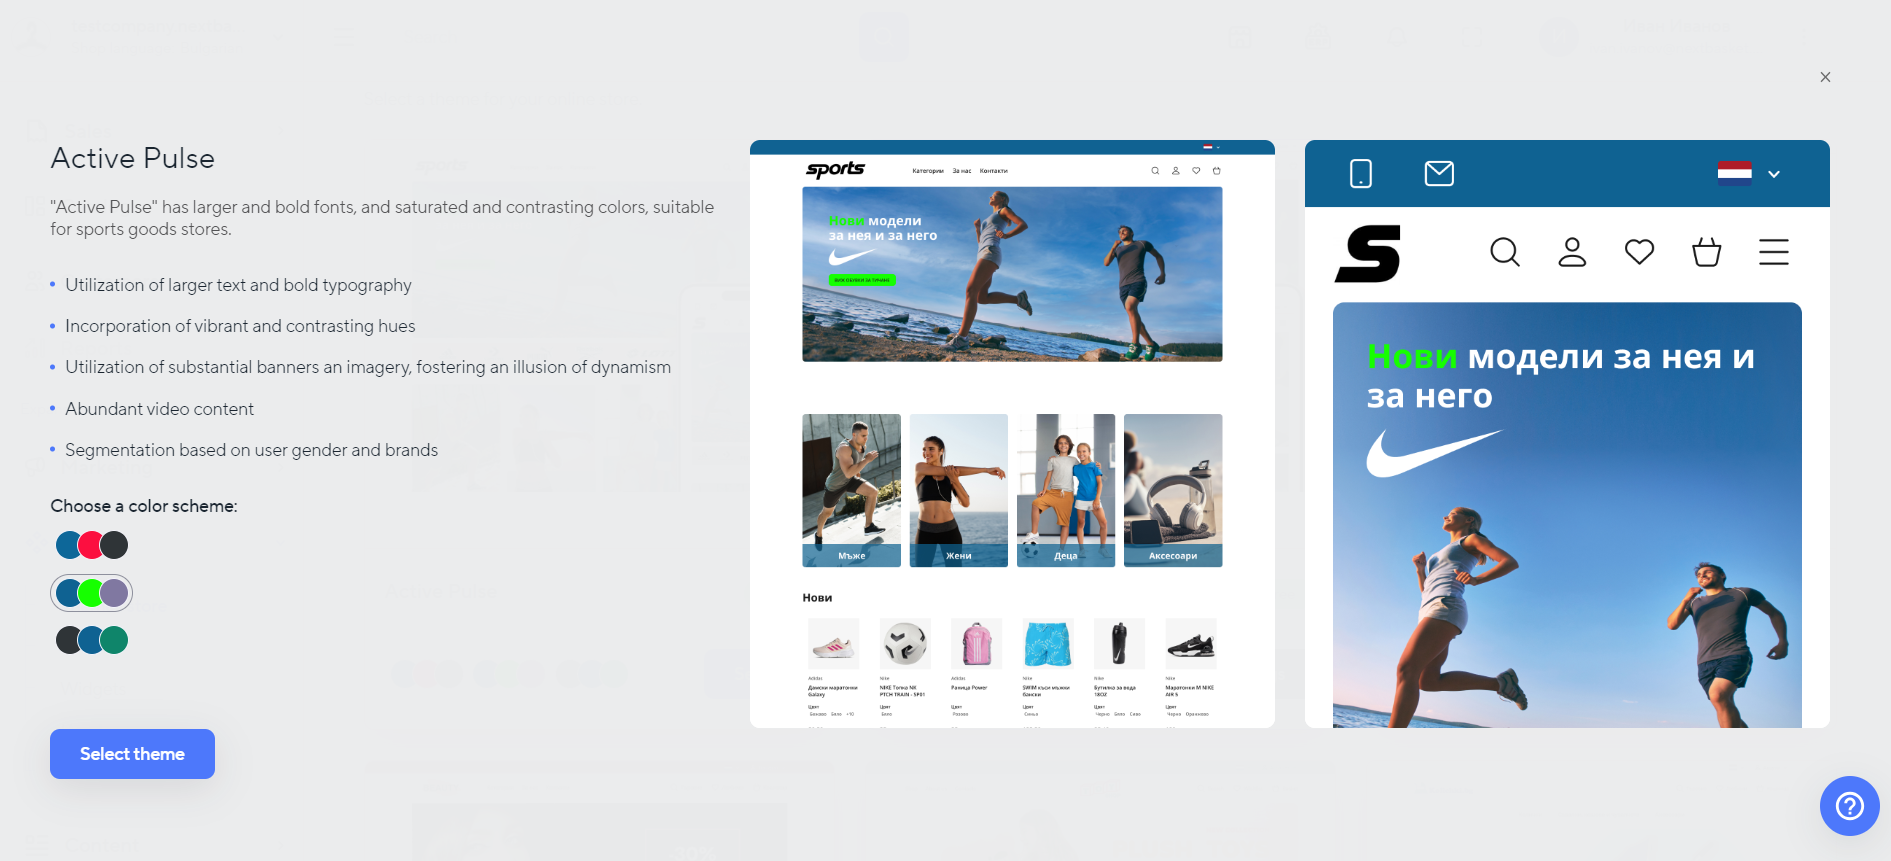
Click the Next button.
Step 4: Successful Registration
Activate Your Account
You will receive an email from NEXT BASKET confirming your registration at the email address you provided during registration. This confirmation email is valid for 24 hours. If it expires, you will need to repeat the registration process.
Complete the Registration Process
In the Registration fields, enter the following information:
- Password - Make sure your password includes both lowercase and uppercase letters, as well as special characters.
- Repeat the password and submit it.
To access your newly created online store, click the "Log in to the admin panel" button.
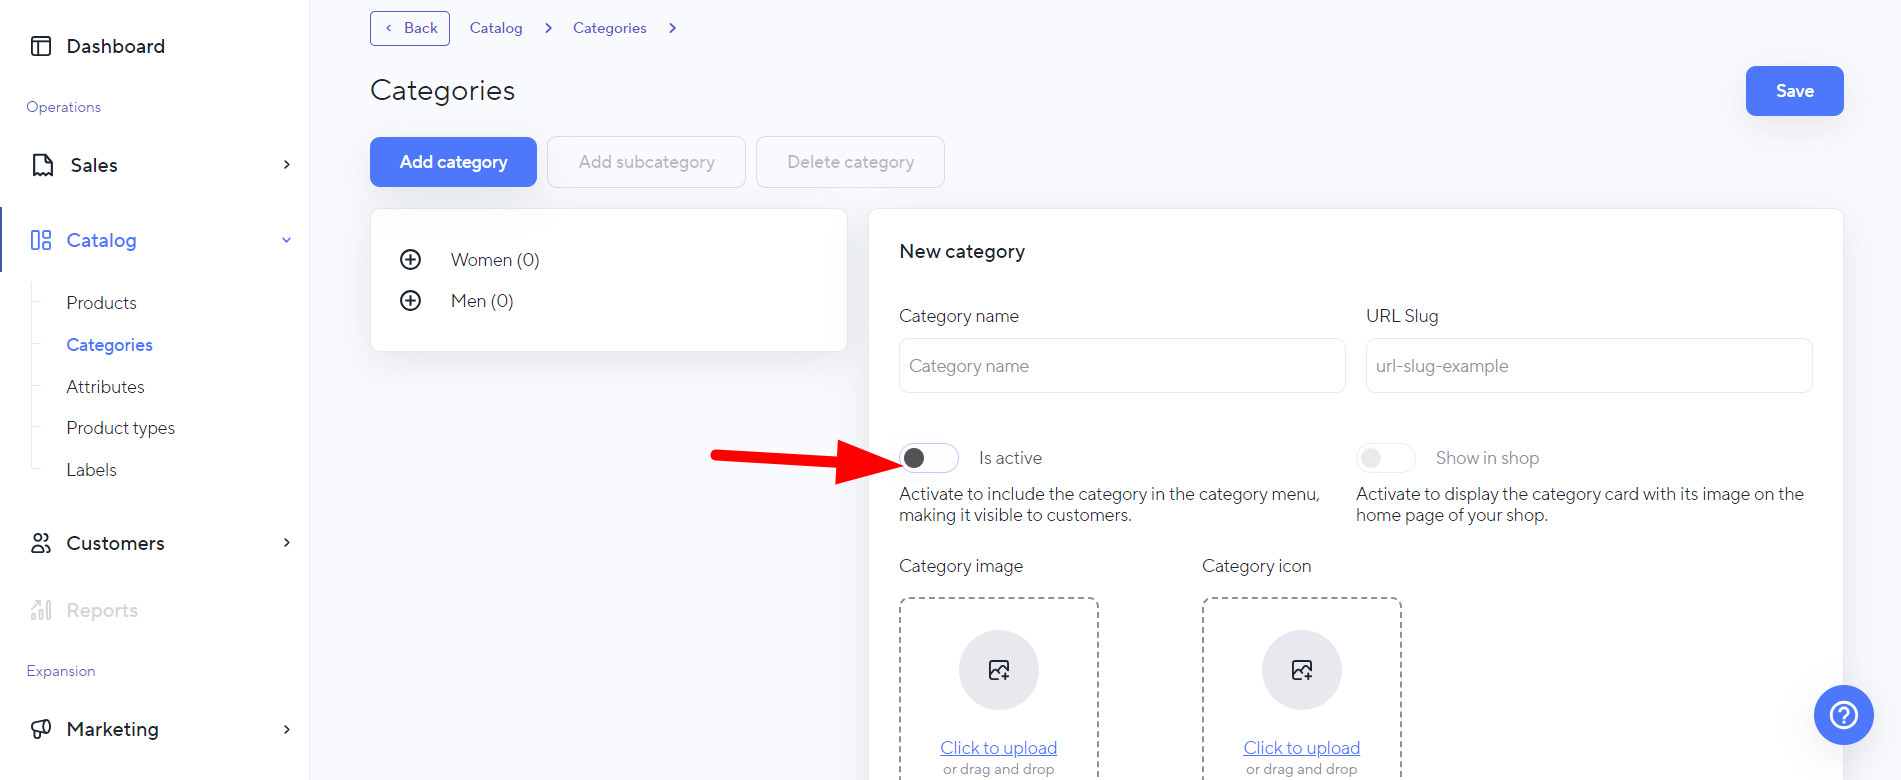
Creating Product Categories
Go to Catalog > Categories and fill in the fields.
1. Enter the Category Name.
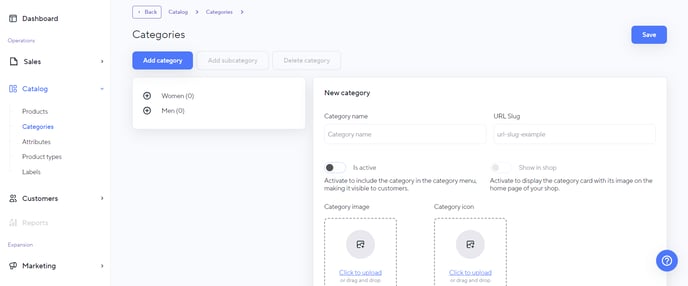
Use the toggle switch Show in shop to determine whether your category will be visible in the online store (it is turned-off by default).
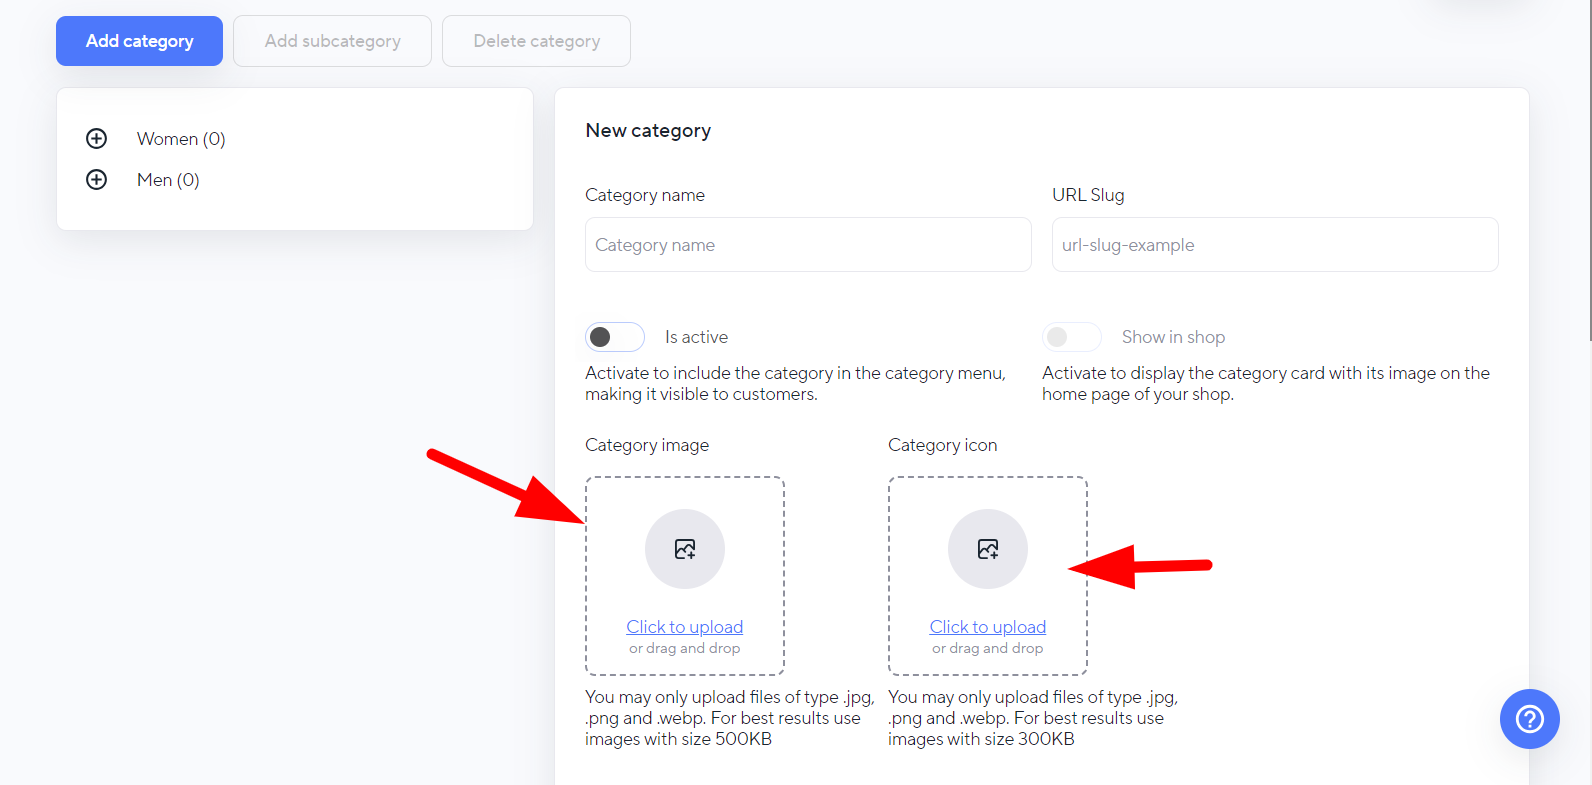
- It is recommended to have an Image for your category. Name your image with an SEO-friendly title and upload it in the corresponding box.
- It is recommended to have an Icon for your category. Name your icon with an SEO-focused name and upload it in the corresponding box.
- Below, you will find a Description field for your category, which you should fill out.
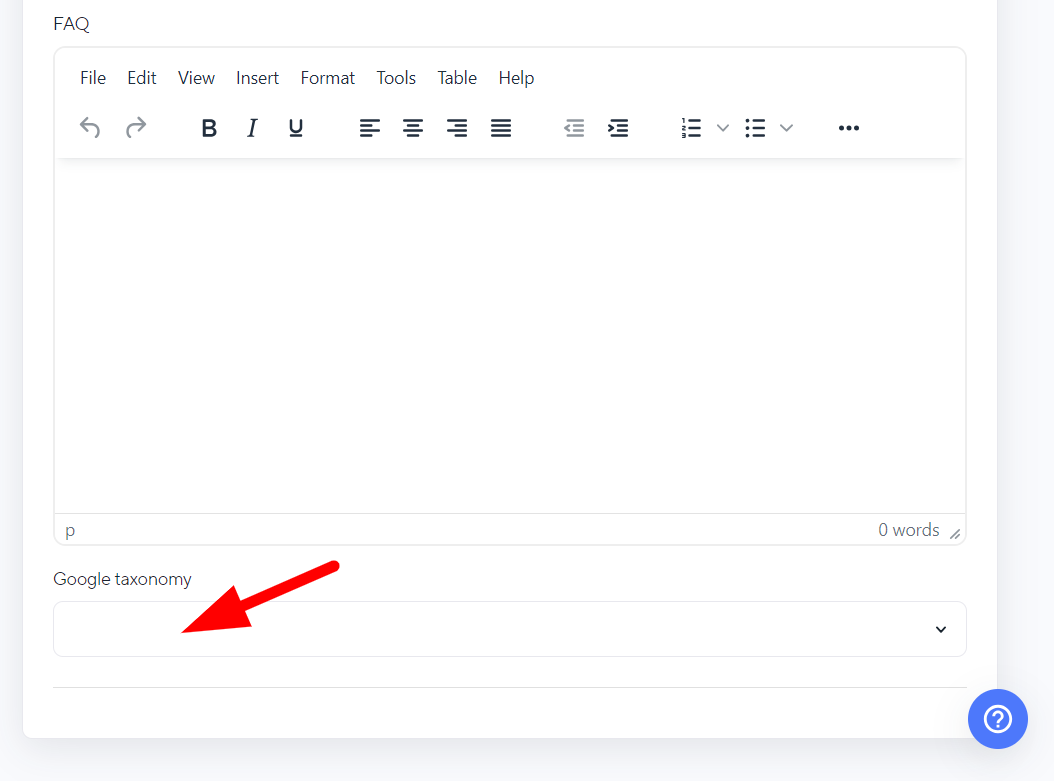
- You can also enter Frequently Asked Questions for your category (this field is not mandatory).
- From the Google Taxonomy list, select the category that best matches the one you are creating.
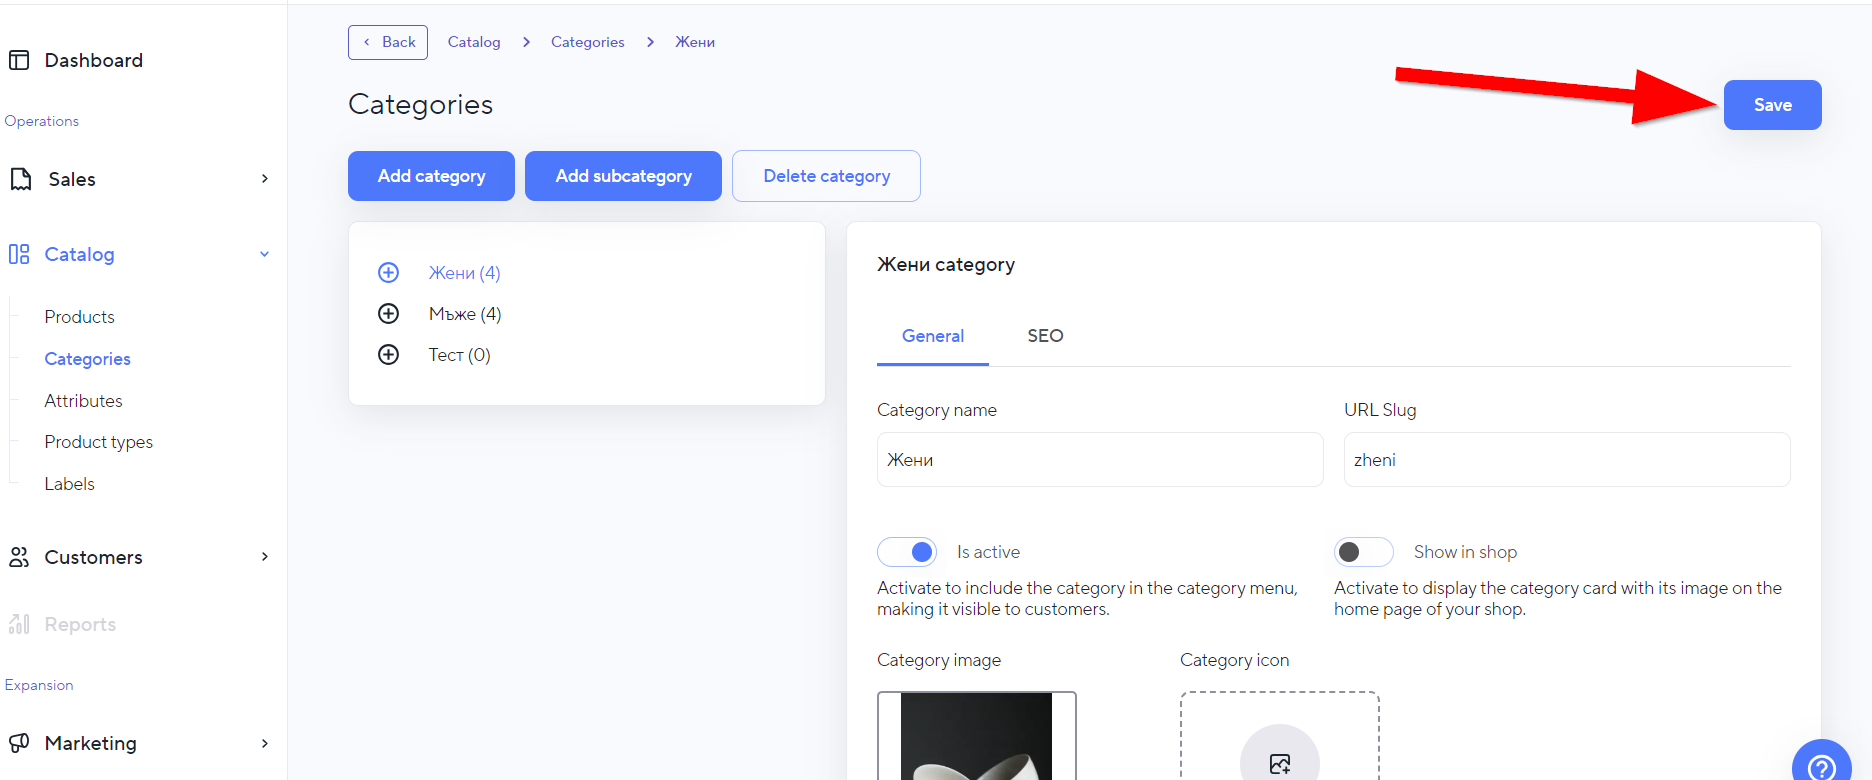
Click "Save" in the upper right corner of the screen to confirm the creation of the new category.
Updating an existing category
Catalog > Categories
You can always change one or more properties of a category. For example, you can add a question from the "Frequently Asked Questions" section or expand your description.
Updating a category means changing one or more of its settings. To edit a category:
1. Select the category you want to update.
2. Enter the values you want to change, such as the description or adding SEO information.

To confirm the changes you made, click the "Save" button.
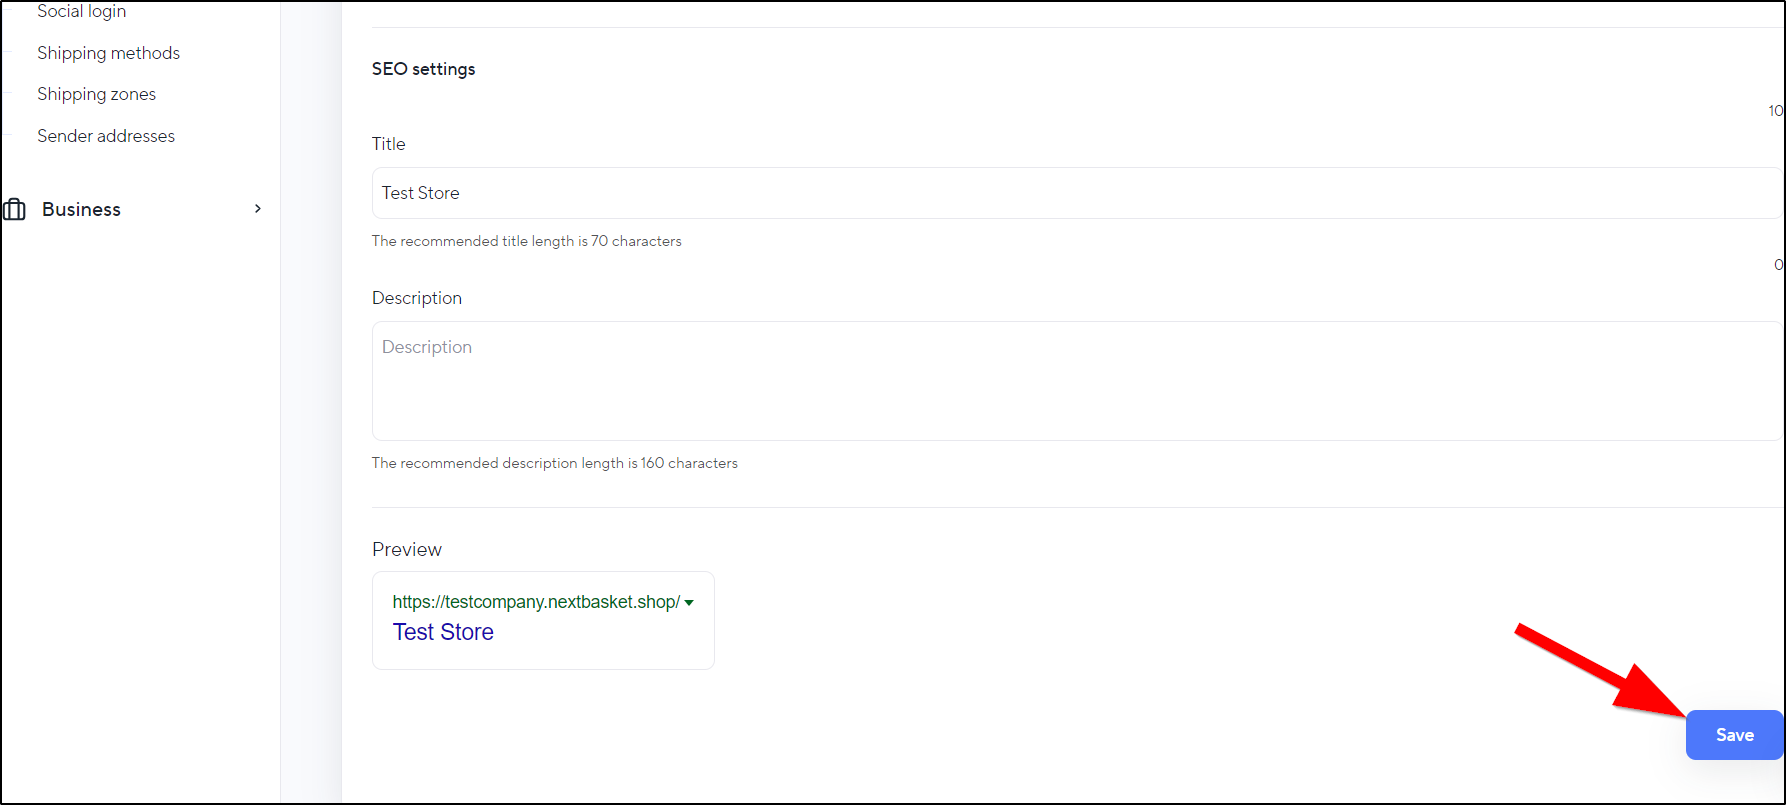
Configuring SEO for a category
1. Select the category you want to update.
2. Select the next section: SEO.
3. In the newly displayed panel, enter an SEO-friendly title for the category.

4. Directly below it, enter an SEO-friendly description for the category.
5. To confirm the changes, click the "Save" button.
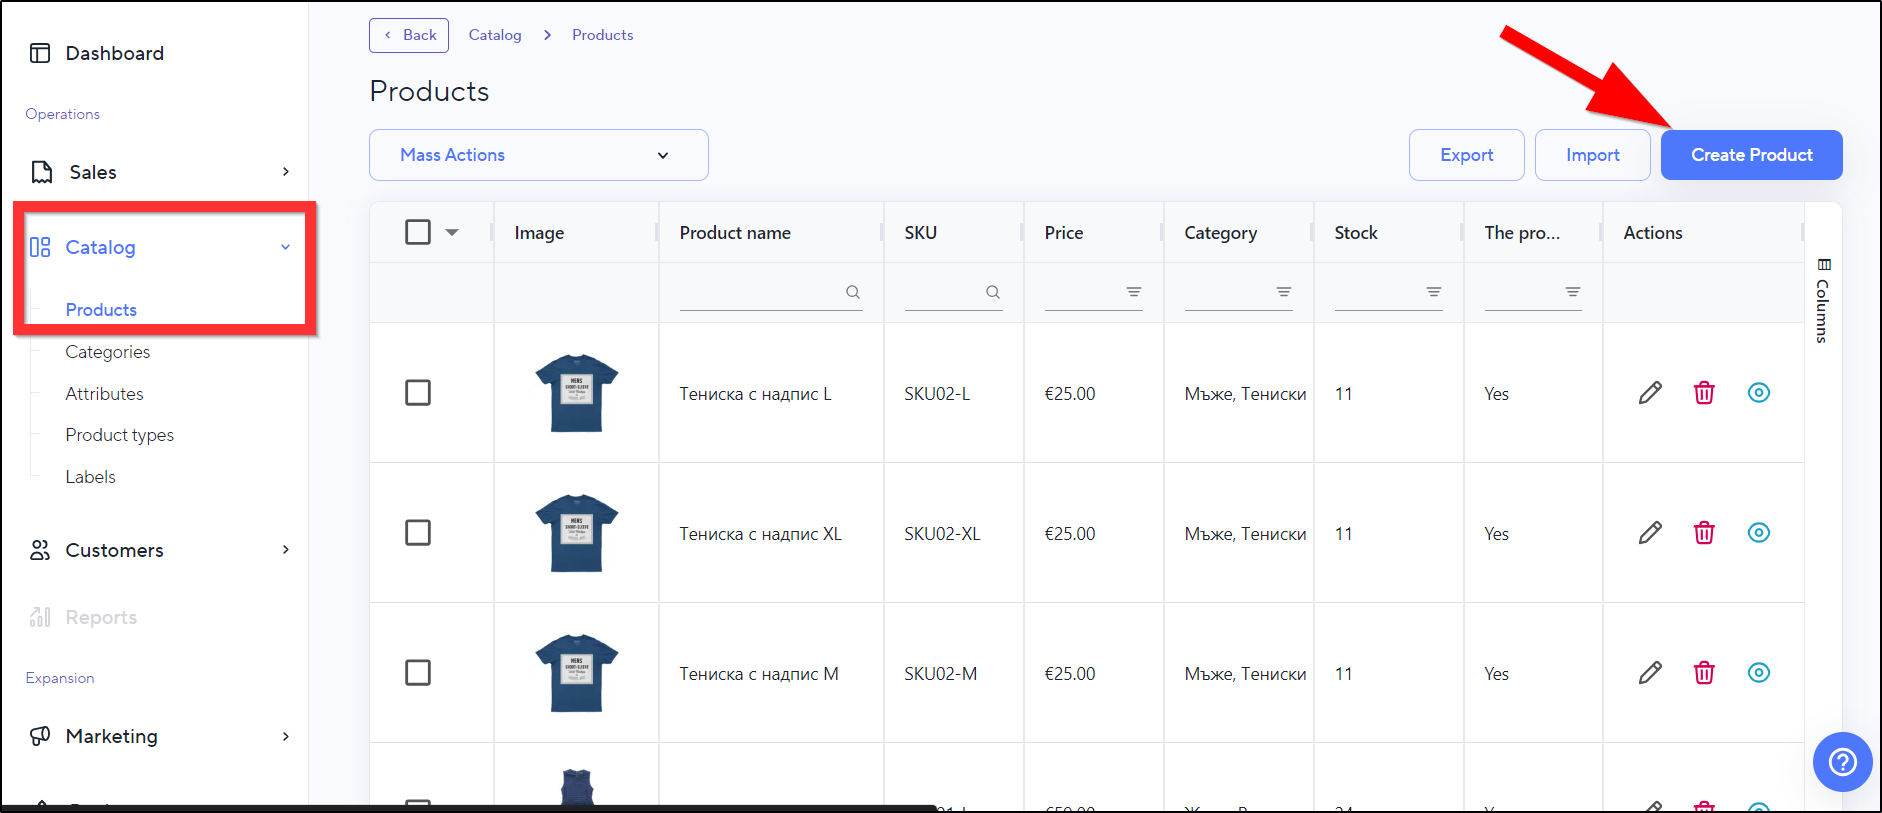
Creating Products
To create a product, go to Catalog > Products and click "Create Product."
Step 1: General Product Settings
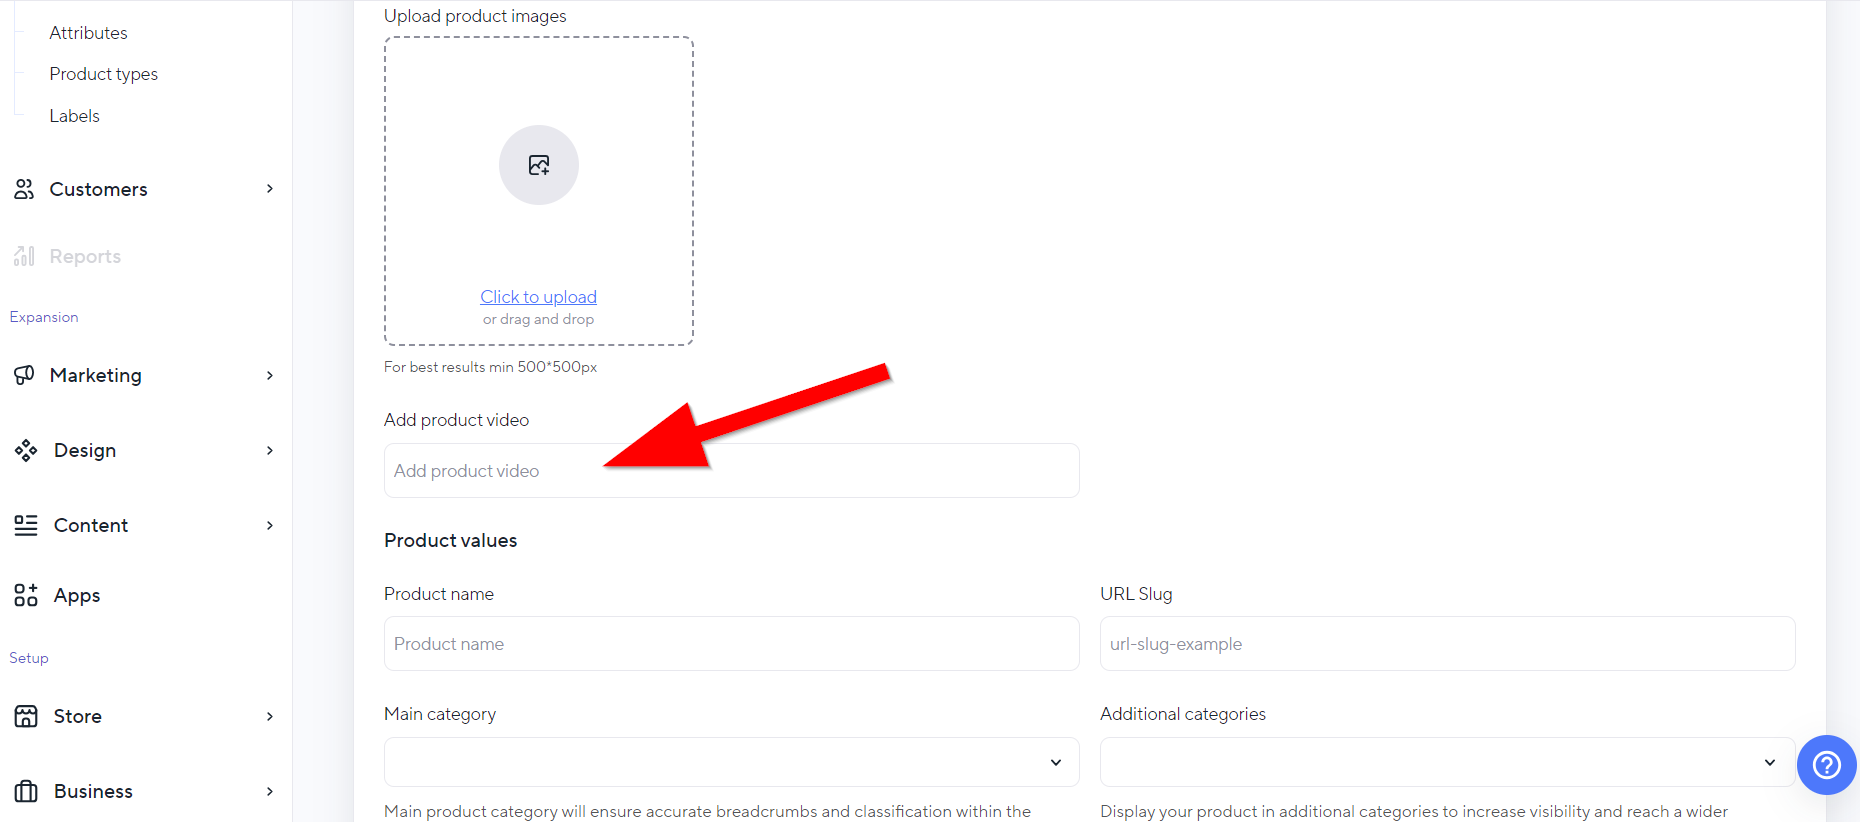
Adding Images to the Product
1. You can upload more than one image.

2. Adding a video to the Product: Please note that the NEXT BASKET platform does not store your video. You can use videos from various video platforms like YouTube. The process consists of several steps:
Under the relevant video, click the "Share" option and select "Embed."

Paste the copied code into the Add Video field.
Adding product values
For each product, you need to provide the following data:
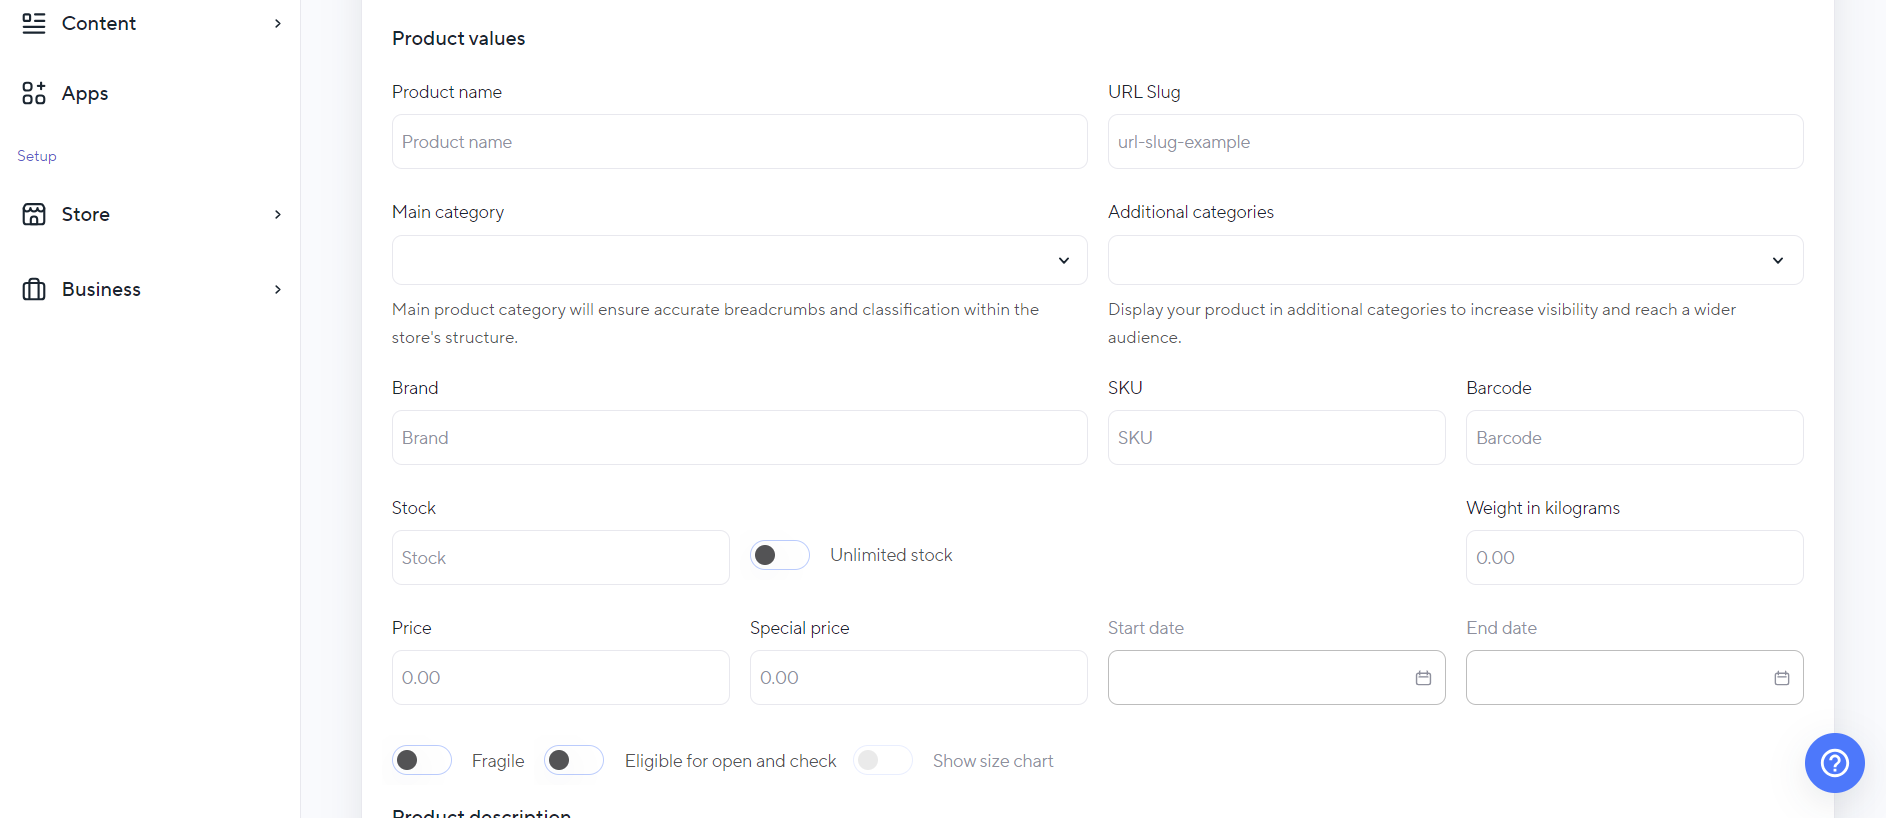
- Product Name - enter a descriptive name.
- URL Slug - this will be automatically filled after entering the product name.
- Main Category - choose a category from the ones you've created.
- Additional Categories - optional field. Brand Name - optional field.
- SKU (Stock Keeping Unit) Value, typically a numeric code (optional field).
- Barcode Number - optional field.
- Availability - enter the quantity of products. This field is inactive when the "Unlimited Stock" toggle switch is activated.
- Price per Unit.
- Special Price - intended for discounts, this value replaces the Price. You can automate your promotion by setting a start date (Start Date) and end date (End Date) for the period during which the special price is in effect.
- Weight in kilograms.
- Fragile - activate this toggle switch to mark the product as fragile.
- Eligible for open and check - activate this toggle switch to indicate that the recipient of the product can open the package upon delivery.
- Show Size Chart - activate this toggle switch to apply the created size charts through the Size Chart app (in the Applications section).
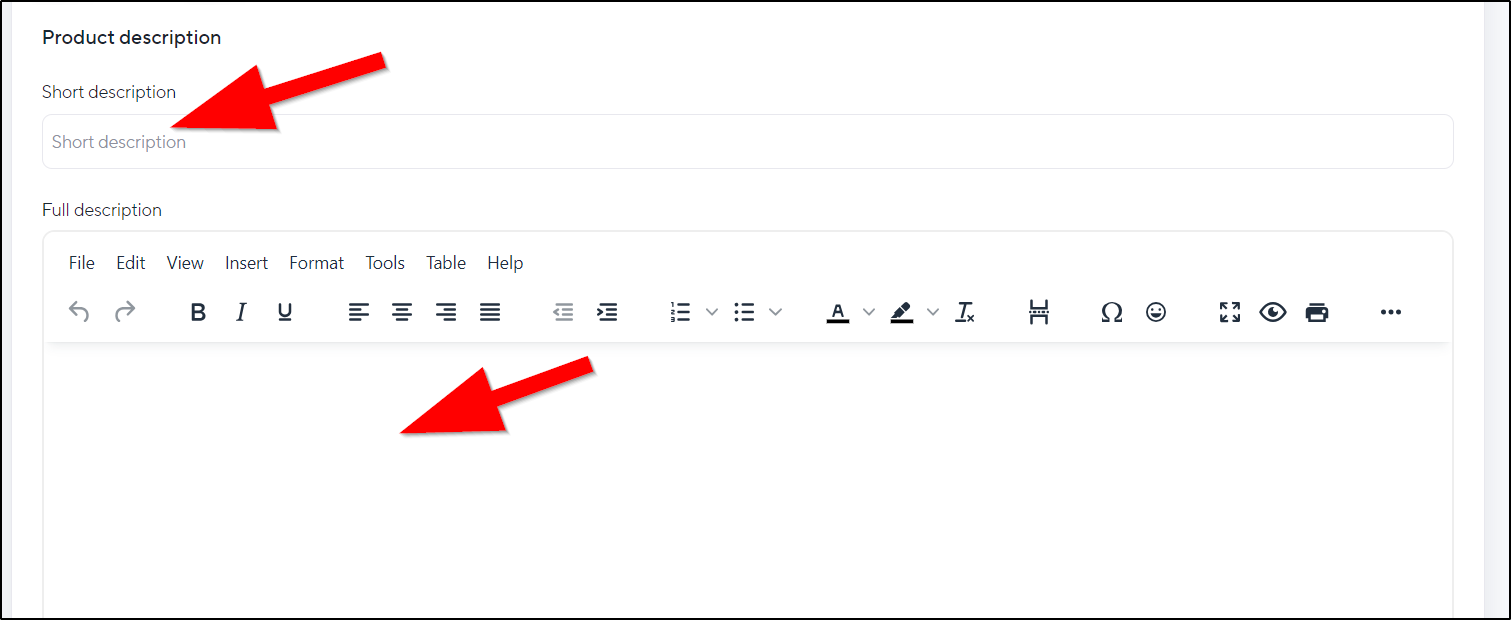
Below in the section, enter the Short description and Full description. This content is useful for the SEO of your products and for a good user experience.
Attaching Documents to products
In the Attached Documents table, you can add additional documentation for the product, including manuals, legal information, and more. Explore the process further.
Step 2. Adding attributes to a product
The Attributes section allows you to add attributes to the product. If you haven't created attributes yet, you can do so without leaving the Create Product page.
More information about the process of creating attributes.
Step 3. Creating product variants
Creating Variants is useful when you have multiple versions of the same product.
You can add variants while creating your first product. After saving it, the product and its variants will appear as different products in your online store.
Learn how to create a Product Variant.
Step 4. Providing SEO settings
This section allows you to improve the SEO content for a specific product. These settings are not mandatory, but it is recommended to fill them out to make your products more discoverable in online search engines.
To set up SEO for a new product, after entering General Information, go to the SEO section and click the Save button.
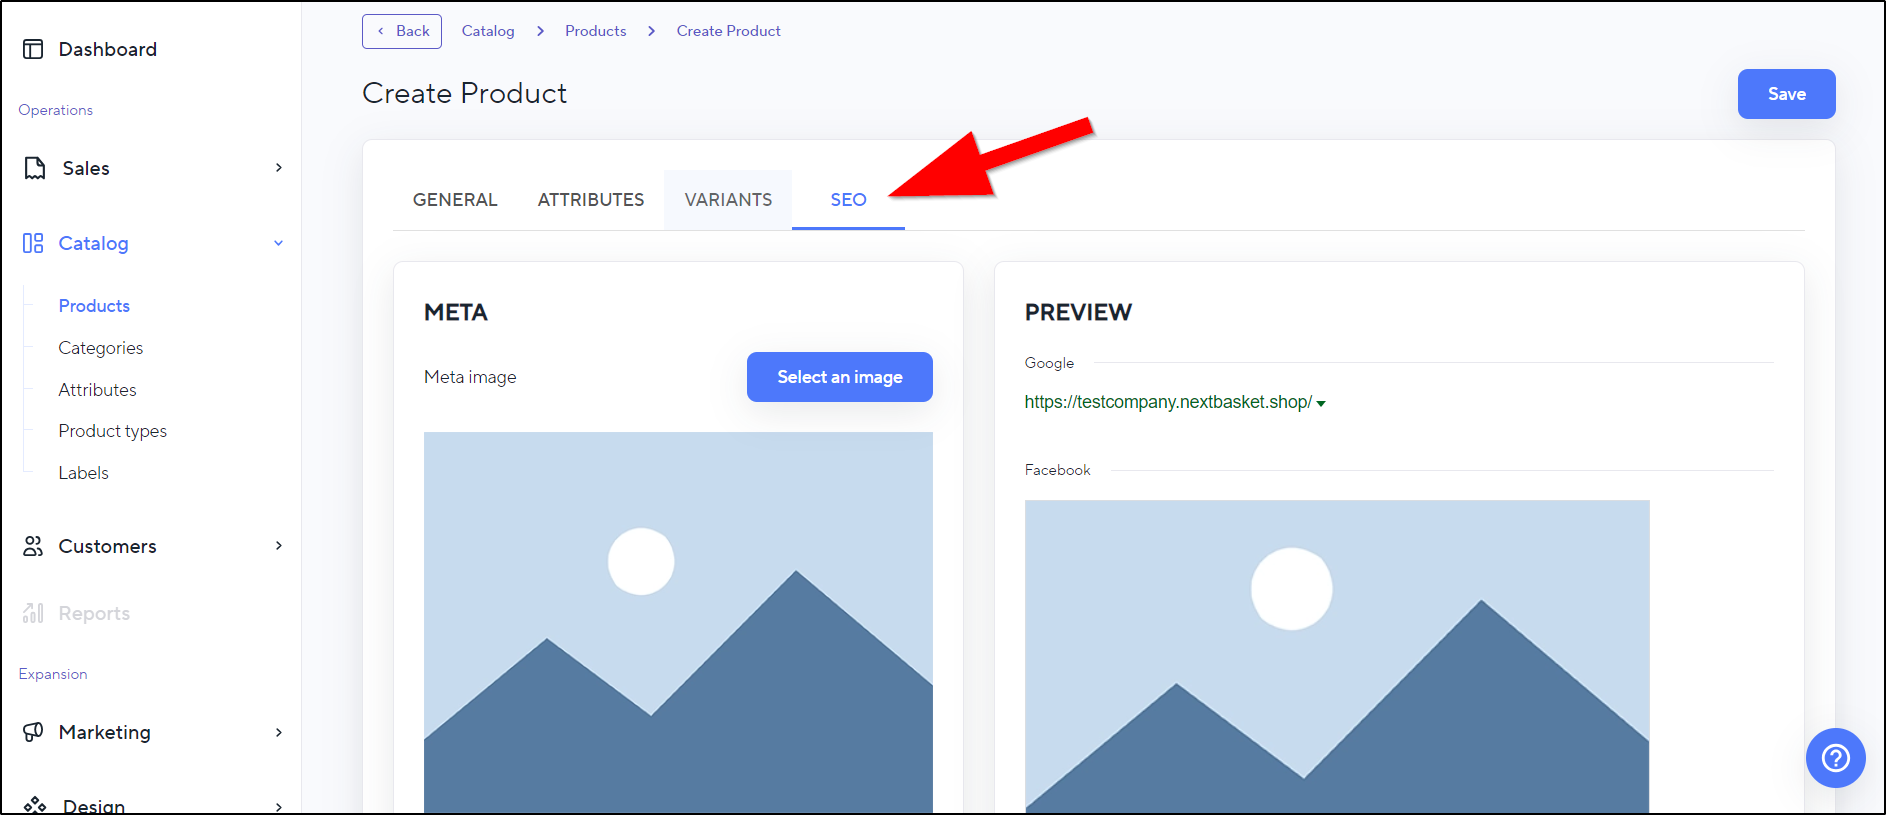
For each created product, the entered name, short description, and image (in the General section) will be automatically used for its SEO settings. You can edit the SEO information for a specific product at any time.
Creating attributes
More information on creating product attributes.
Creating product types
Explore the process of creating product types.
Design of your online store
Through the NEXT BASKET platform, you can easily customize the design of your store.
Creating Banners and Slots
For better marketing campaigns, it is recommended to use banners on your online store. Banners are images and/or text, primarily used for advertising a product or service. They are placed on the home page of the online store. You can easily create and manage them from the Admin panel.
Adding a Banner
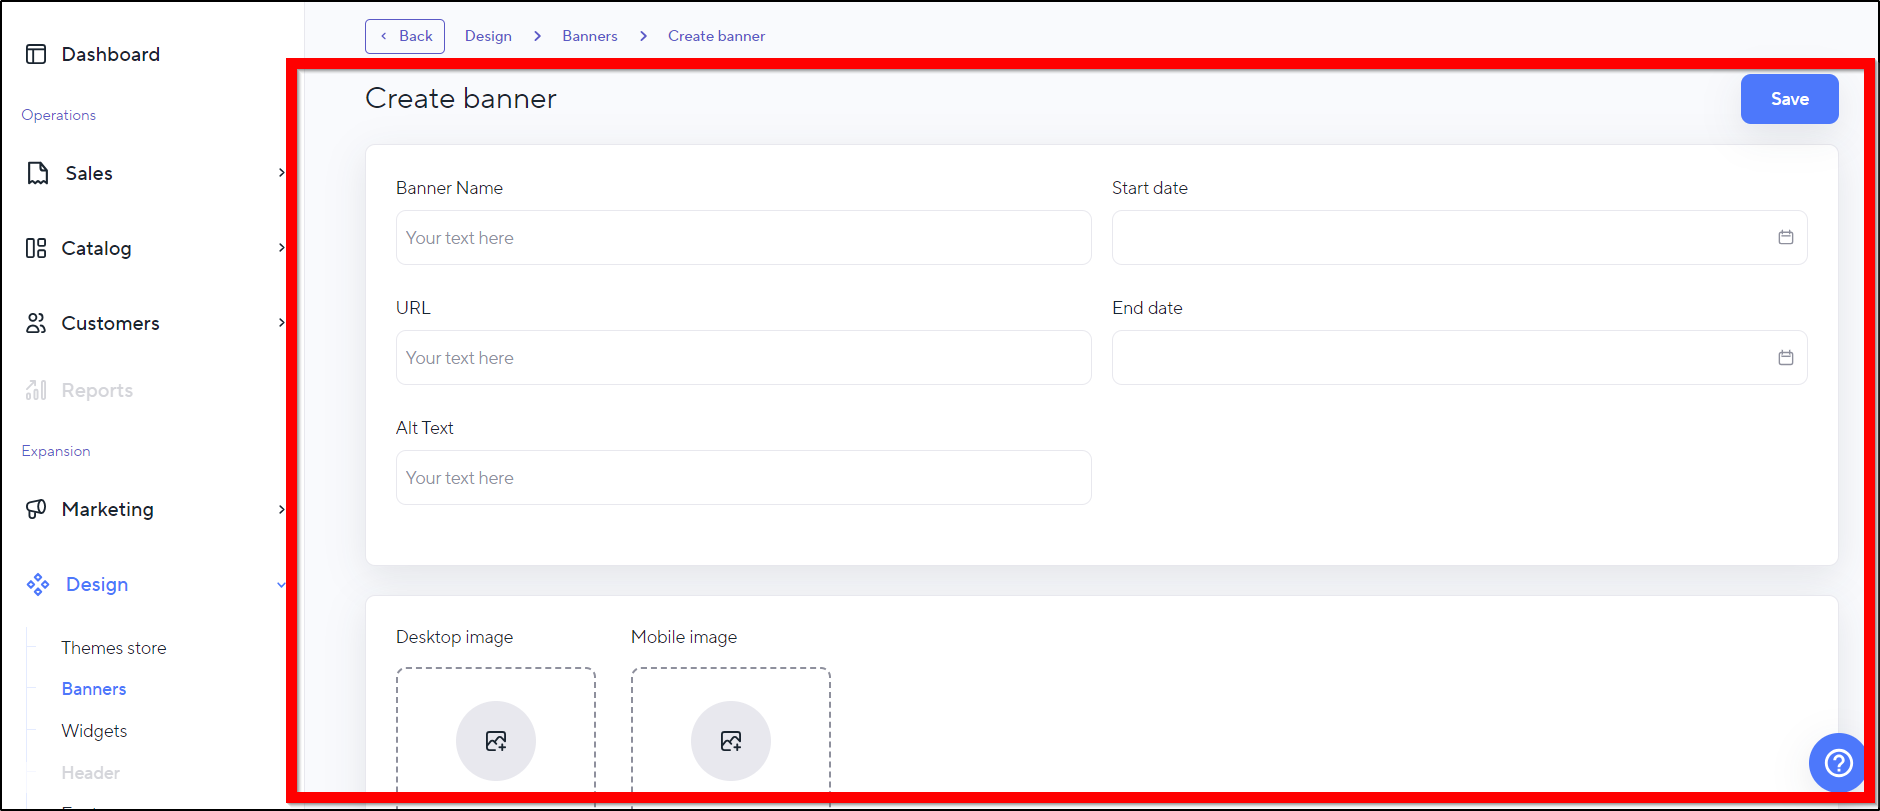
In the Admin panel, go to Design > Banners > Create banner.

1. Enter the banner's name. It will only be visible in the Admin Panel.
2. Enter the URL - copy and paste the online address of the page the banner will link to.
3. Enter the Start date (mandatory field).
4. Enter the End date (optional field).
5. Upload the banner images in two sizes:
- for desktop
- for mobile devices (optional)
To display the banner on your online store, you need to create Slots - locations on your online store's page where you can place banners.
Adding Widgets
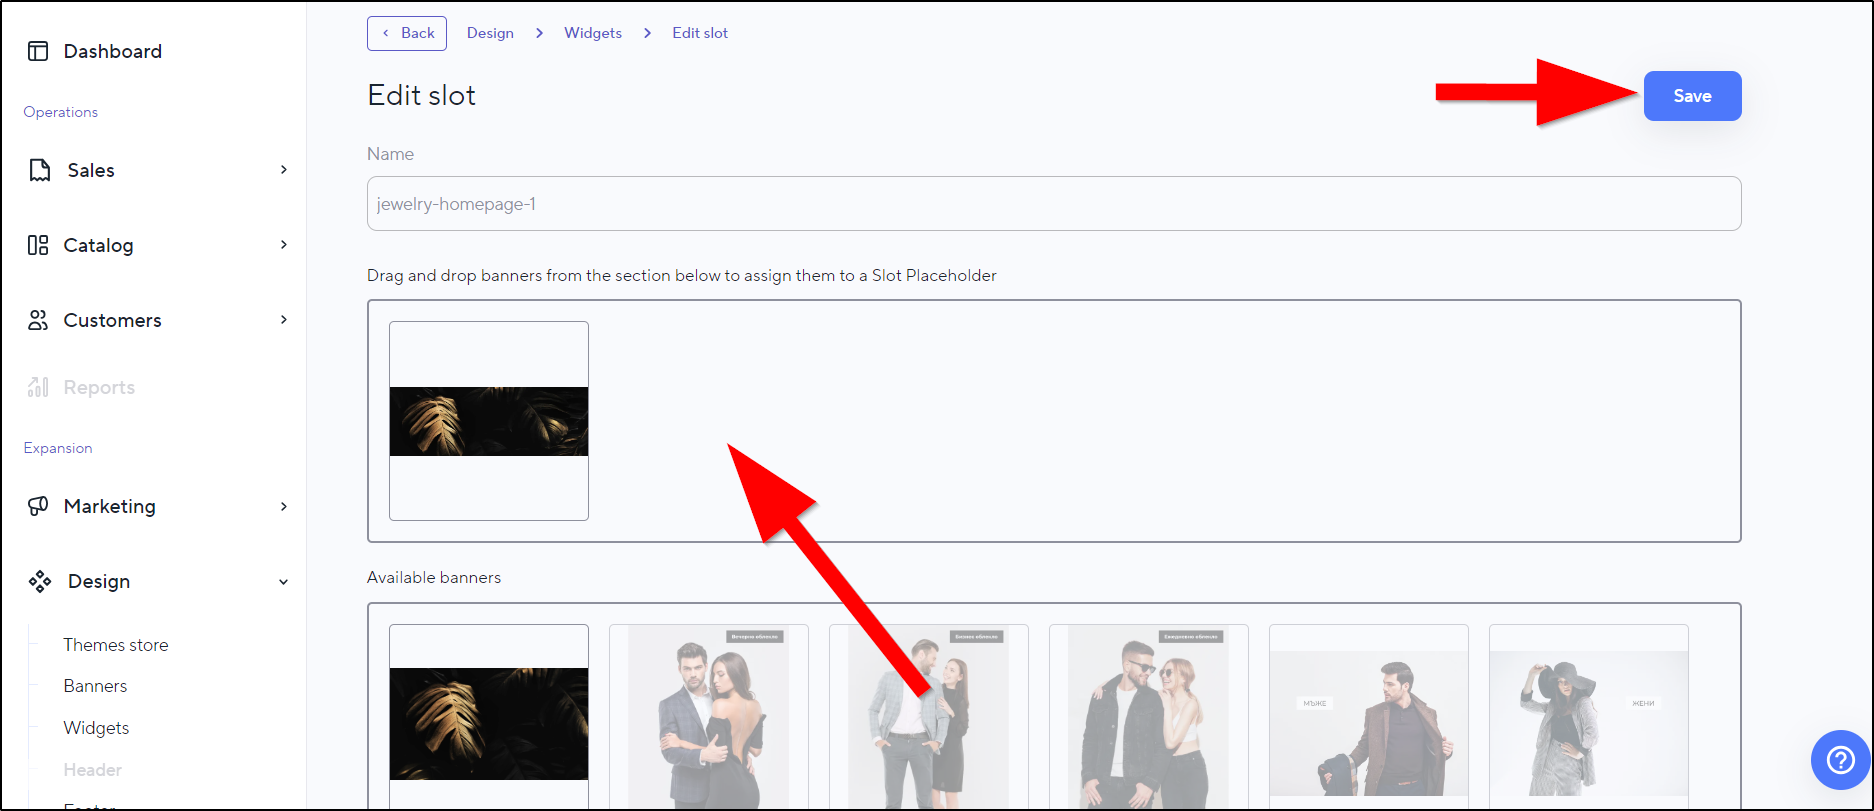
In the Admin panel, go to Design > Widgets.
1. Select a widget (based on the already uploaded banners) by clicking the edit button.

2. From the Available banners section, drag and drop your desired banners into the Slot Placeholder. Confirm the changes with the Save button.
Adding a footer
The footer is the bottom section of a website, typically containing important information such as copyright notices, contacts, terms and conditions, payment methods, and more.
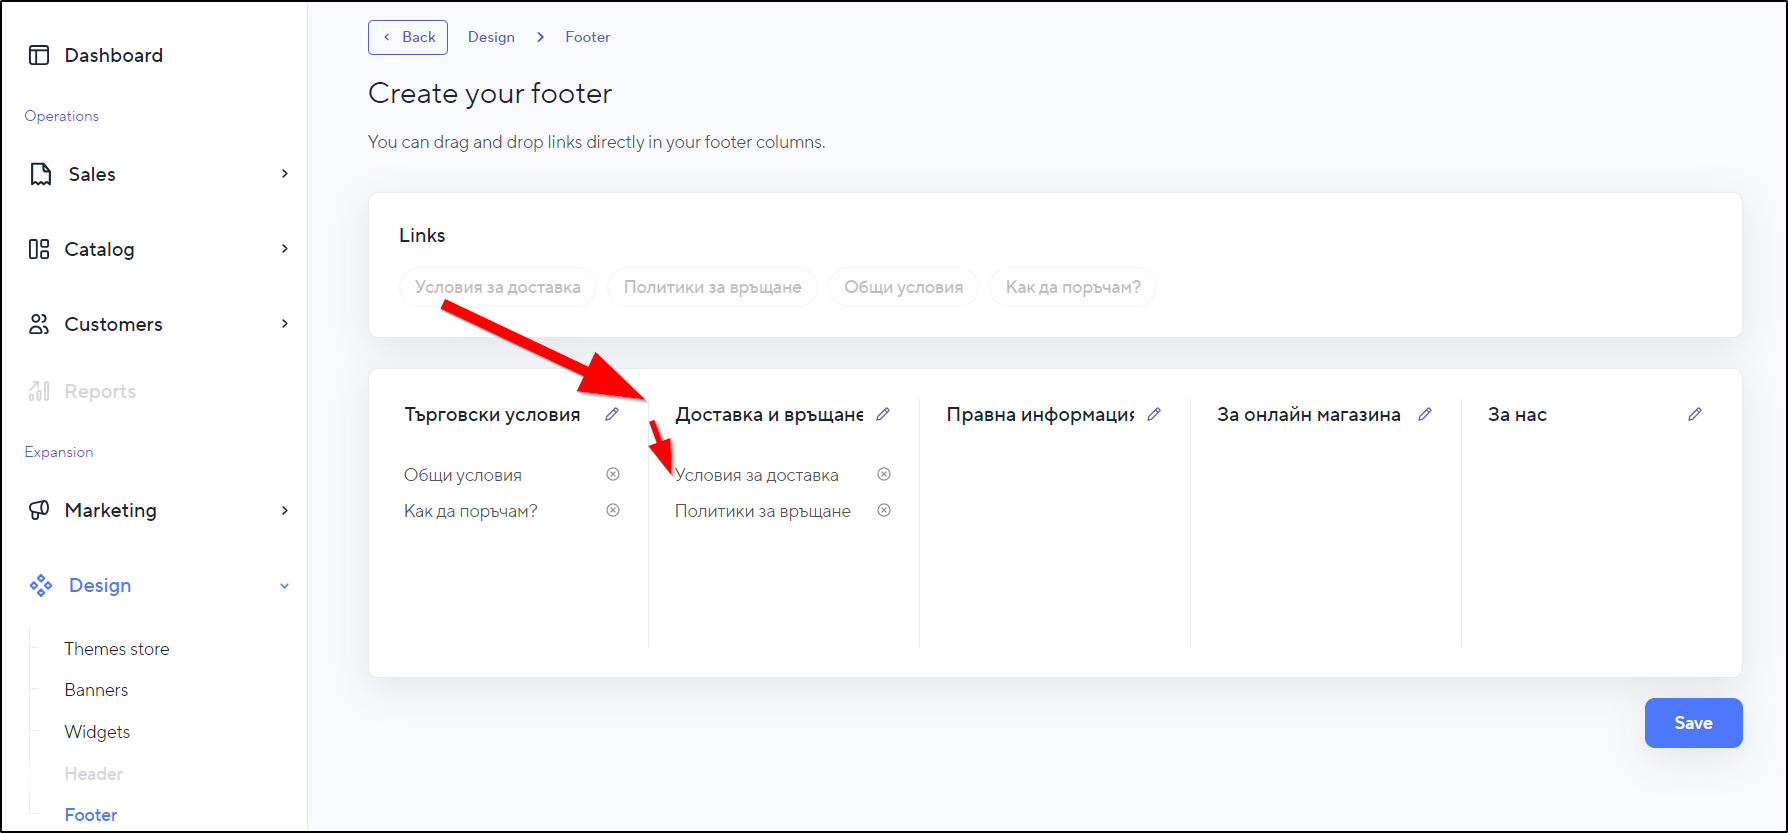
Design > Footer
After creating your online store, you can customize its footer. In the Admin panel, go to Design > Footer.

Initially, the footer of your newly created web store is empty. It contains several default columns, but there are no links associated with them yet.

With each footer column, you can perform the following actions:
- Change the column name: Click the edit button and enter your preferred column name.
- Add or remove links in the footer.
- Change the order of links in the footer.
- Add or remove Content Pages.
Add Content Pages to the footer
Note: You need to create static pages in order to display them in your online store and footer. Learn how to create a static page.
On the Create your footer" page, you can see your created static pages in the Links field. Select a link and drag and drop it to your chosen footer section.
Click Save to publish the footer changes.
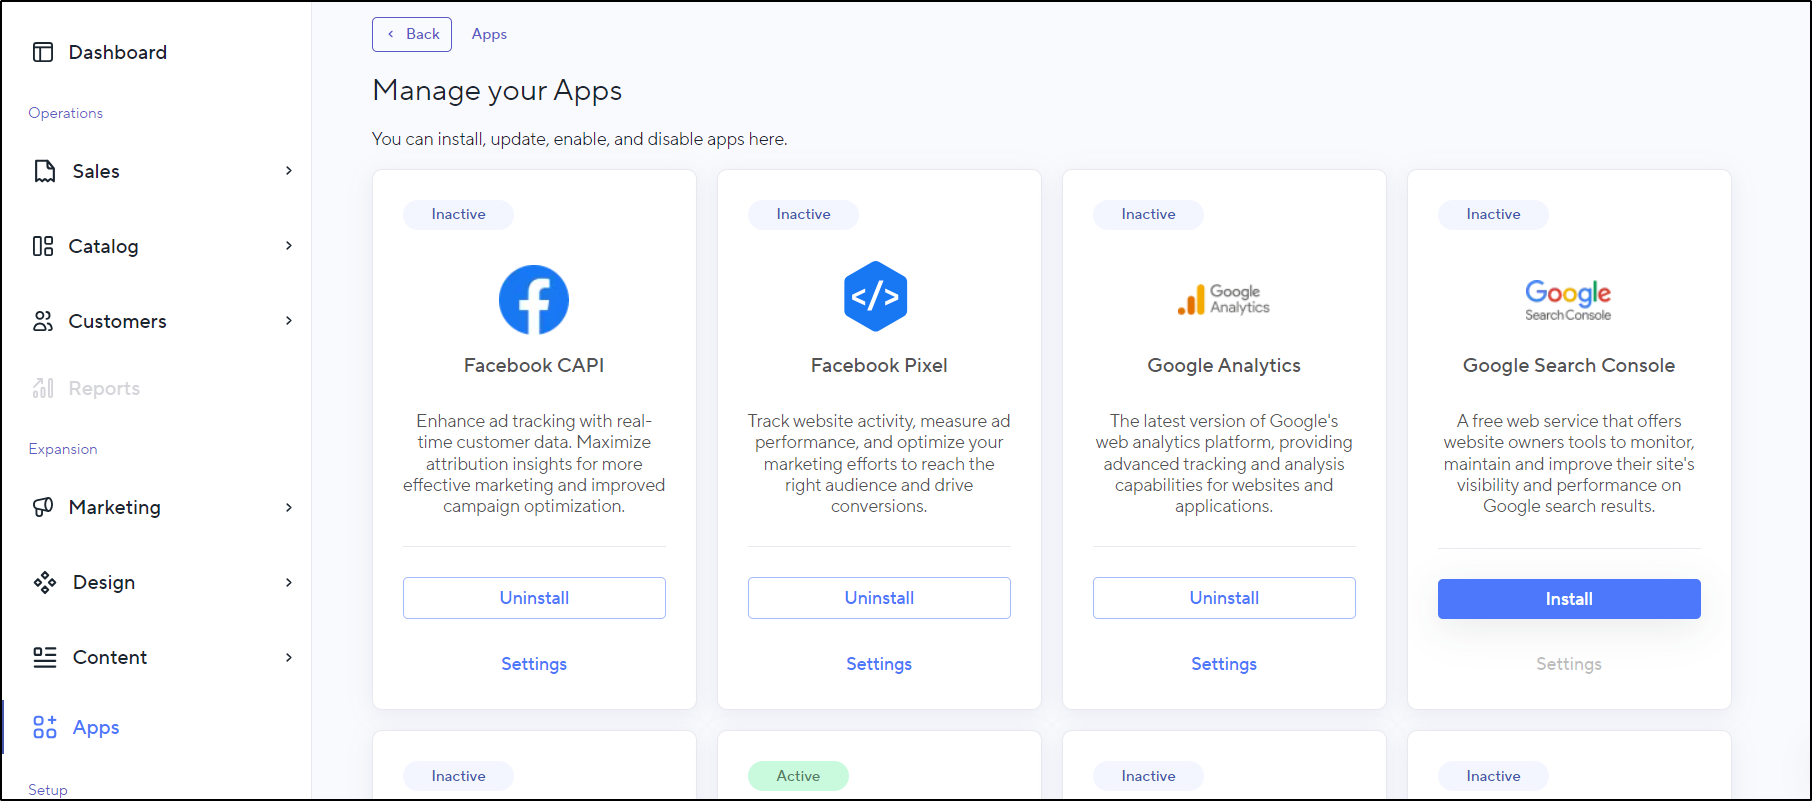
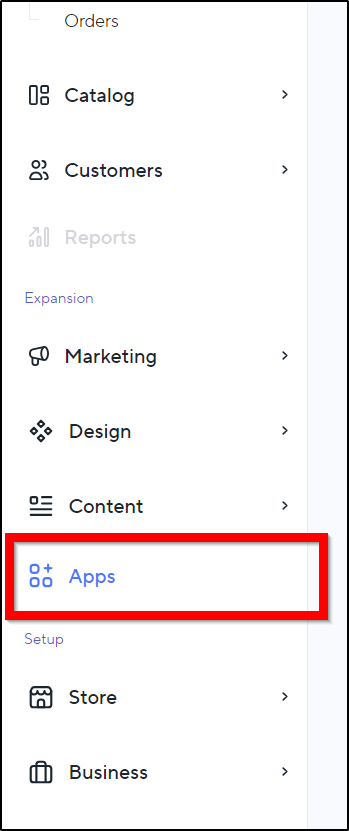
Apps Section
From payment methods to social media advertising and timely and successful delivery of various products, e-commerce cannot function without these foundations.
The NEXT BASKET platform offers the ability to easily incorporate third parties into your online business to improve the quality of the services/products you offer and reach more customers.
To view the applications provided by the platform:
1. Log in to your profile.
2. Enter your store.
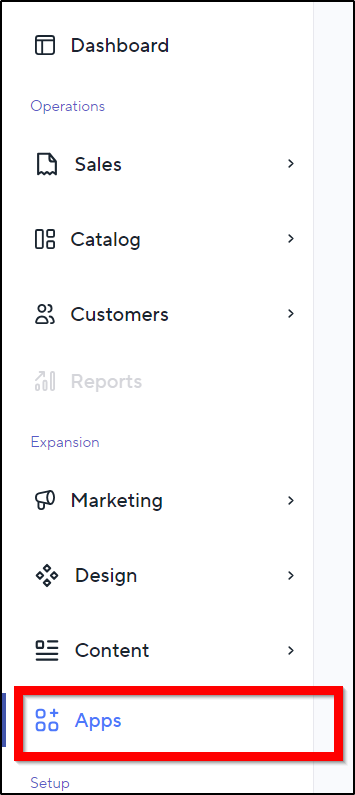
3. While in the Admin panel, scroll down to the left and click on the Apps category.
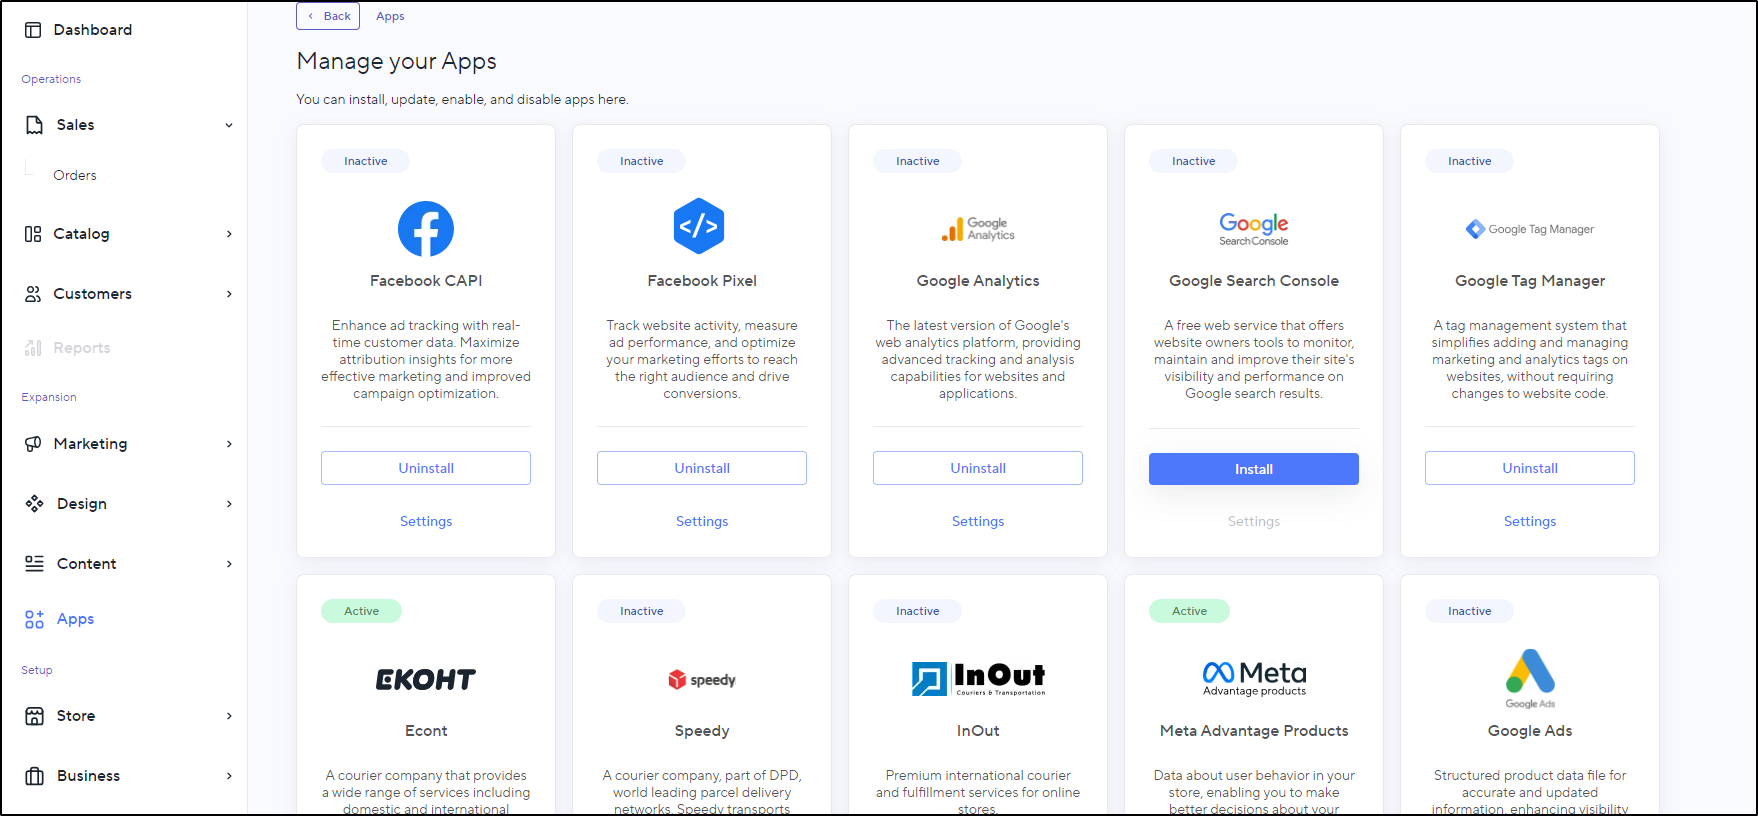
On this page, you will find all currently available third-party applications whose services you can integrate into your online business, and you can deactivate them if necessary.
Activation/deactivation is done easily through the Install/Uninstall buttons.
For each installed application, you also have a Settings button.
Online store settings
In the General settings section, you can make a series of changes to your online store that affect its visual appearance or other aspects related to its functionality and readiness to serve your customers.
General settings
Go to Store > Settings.


1. Site name – usually, it corresponds to your brand name.
2. See the storefront domain name - this is the URL of your online store, excluding the "https://" part. This value cannot be changed.
3. Choose/change your Default Language from the drop-down menu. All elements of your web store's user interface will be visible in the language you select.
4. Choose your Default currency from the drop-down menu. All purchases in your web store will be made in this currency.
5. Enter an email address in the "Email" field. The entered address will be visible in the header of your home page and in the "Contacts" column in the footer.
6. Enter an email address for Recommendations. The entered address will be visible in the recommendations section in the footer (bottom part of the website). Typically, this address is used for suggestions and complaints.
7. Enter a valid phone number. It will be visible in the header of your home page and in the Contacts column in the footer.
8. Enter the physical address of your web store. This field is not mandatory.
Online store logo
Explore the steps of adding your online shop's logo.
Learn how to add links to your social media in your online shop.
At the end of the process with the entered settings, confirm with the Save button.
Configuring Payments
Configuring payments is also an important element in managing your online store.
This is a process that you can easily do through the Admin panel.
1. From the main menu on the left, go to Apps where you can explore and select from current payment apps like ePay, Borica, Stripe, MyPos, Bank Transfer, etc.
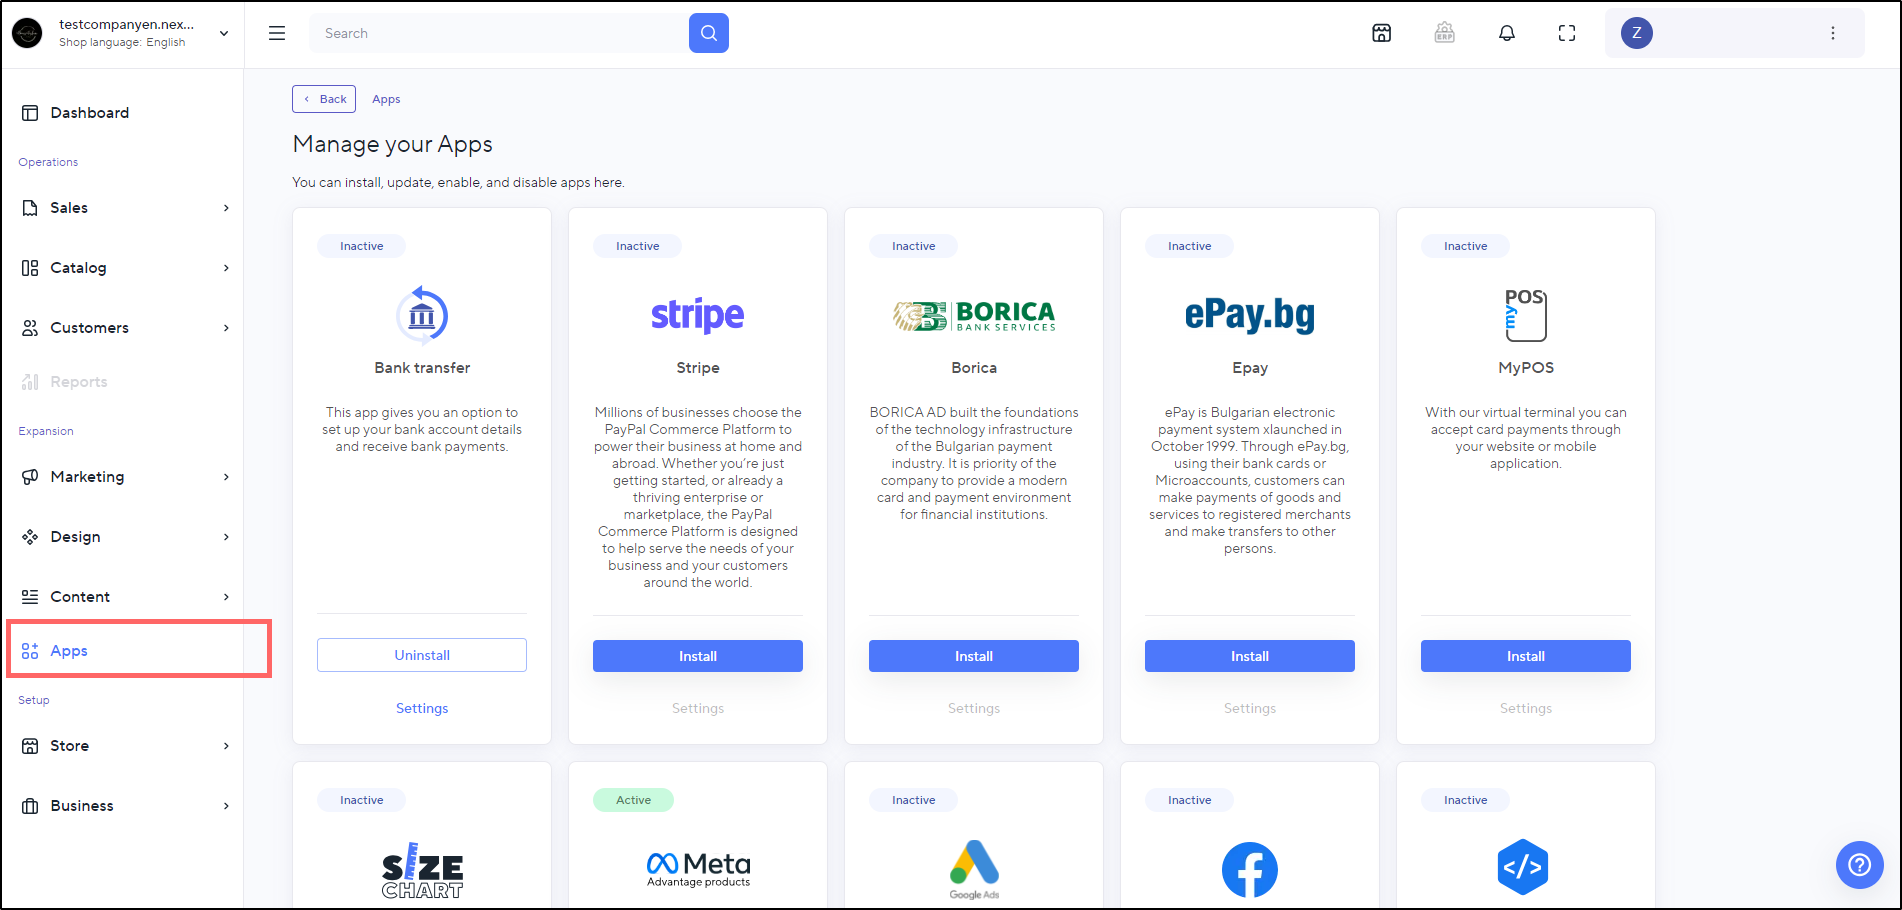
2. Hit Install and then Settings.
3. If you choose to install the Bank Transfer payment method, in the Shipping Method configuration, from the Payment Methods dropdown menu, you can also select any of the already installed payment methods.
Configuring this type of information is vital for the smooth start and operation of your online store. You can edit this information at any time when needed.
The process of setting up the Stripe payment method.
Shipping Methods
Shipping methods are among the most important settings needed for your online store.
1. From the Admin panel menu, go to Apps.
2. Select the desired delivery company and click the Install button.
Fill in the information for the selected delivery provider.
Adding a shipping method
Go to Store > Shipping methods > Add Shipping Method.

Fill in the details and continue with the Save button.
Adding delivery zones
Go to Store > Shipping zones.
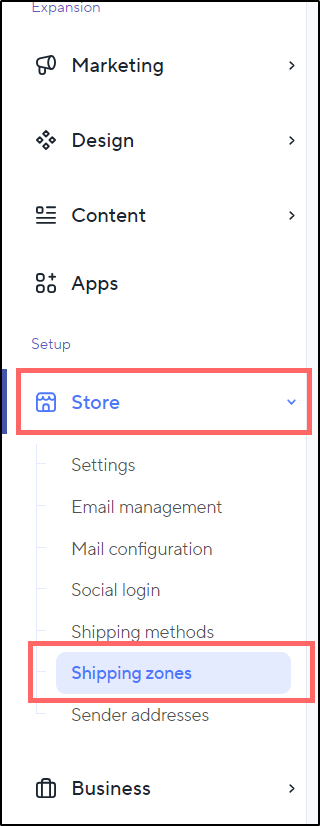
Hit the Add shipping zone button.

Fill in the information and confirm with the Save button.

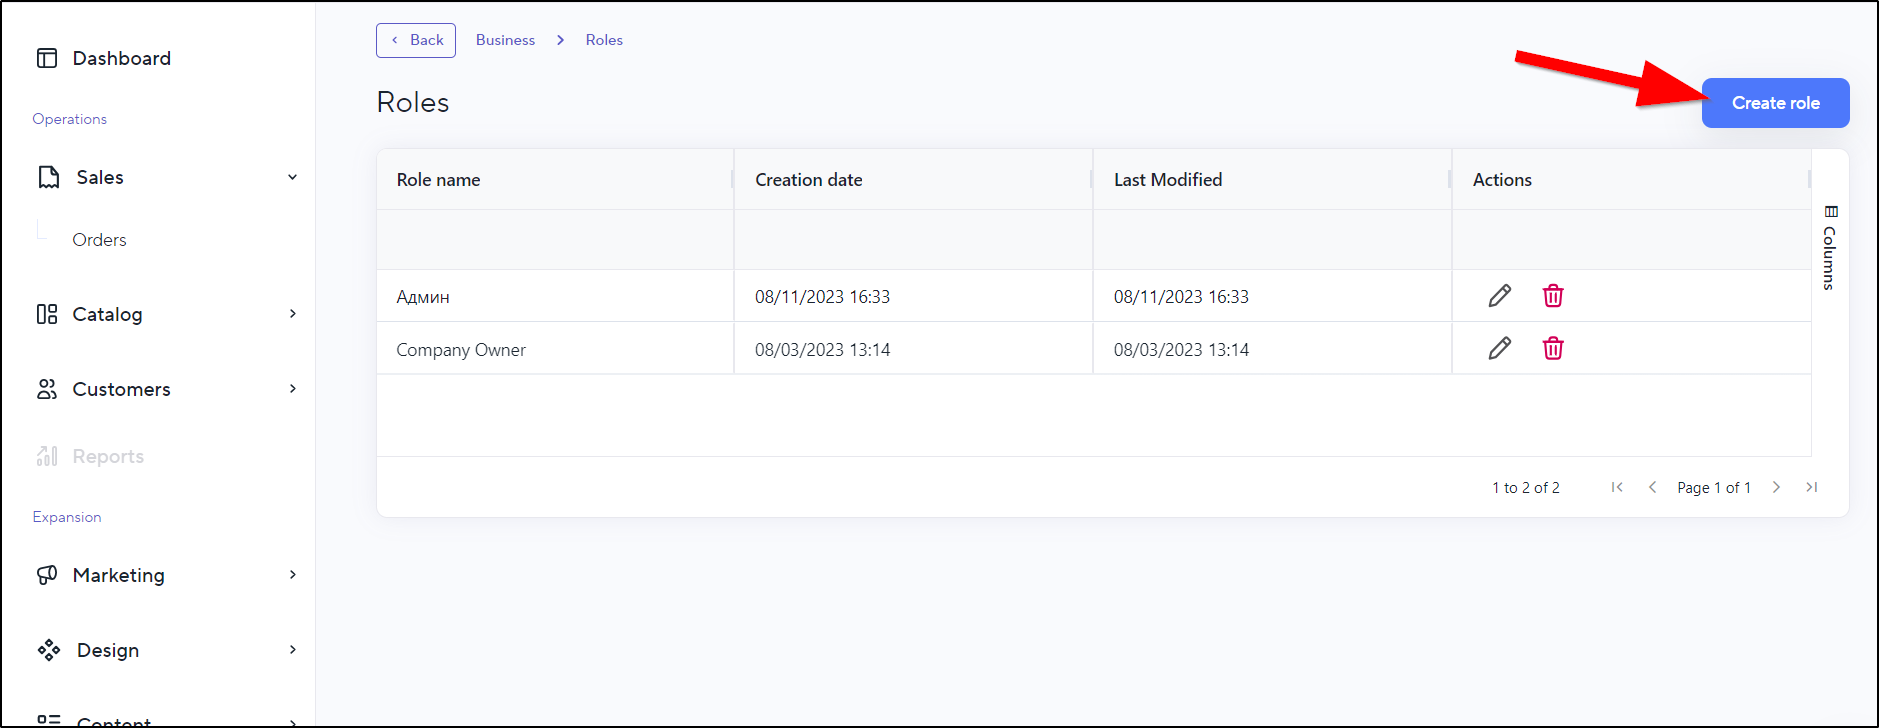
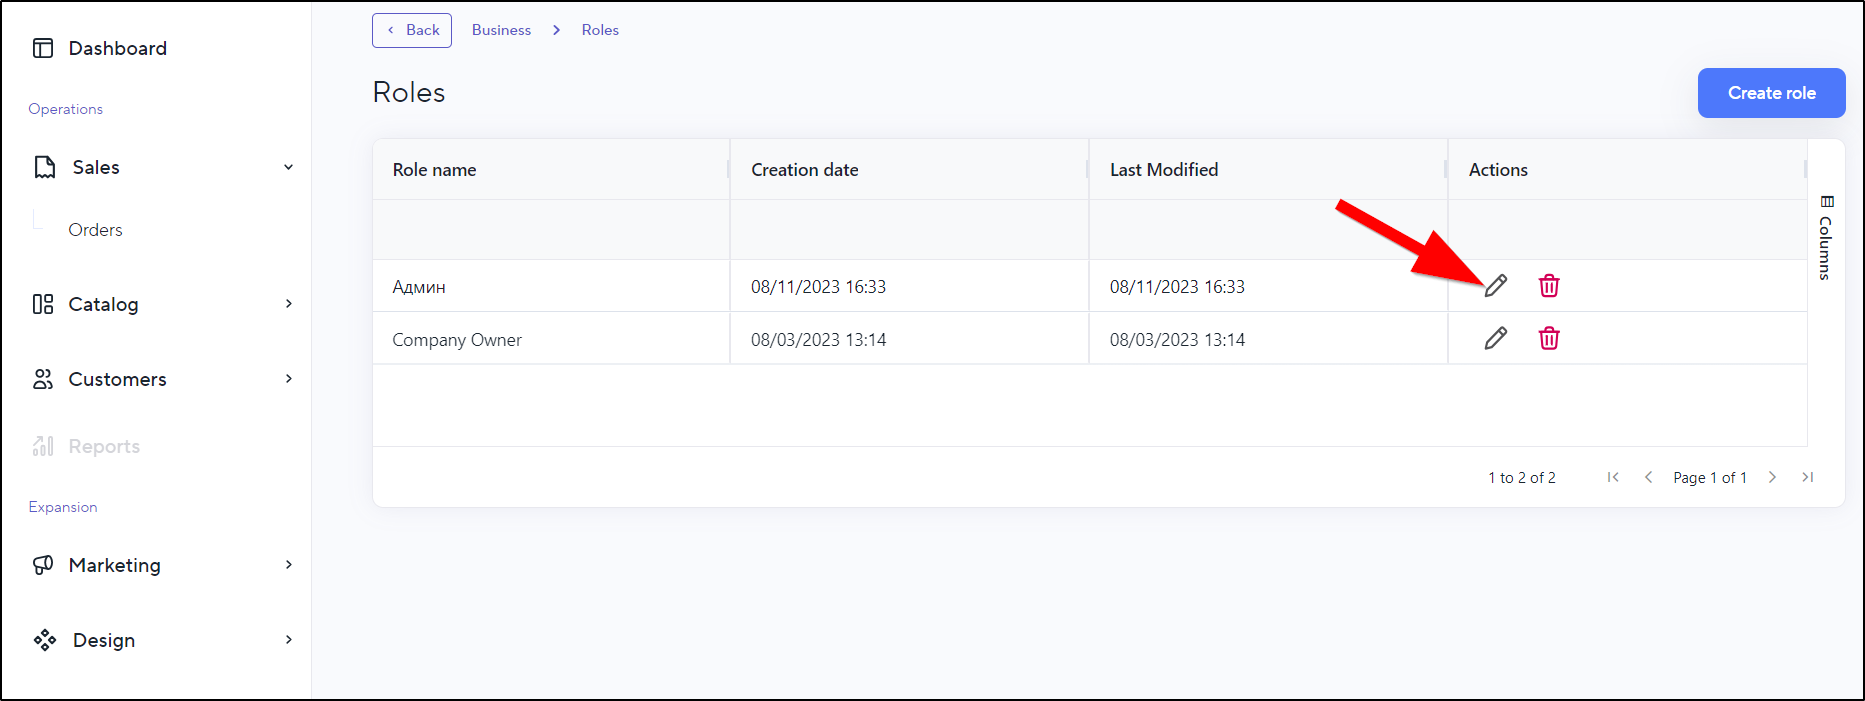
Managing roles in your online store
As the main admin of your store's Admin panel, you can allow or restrict various rights for your colleagues or partners, giving them equal to yours or partial access to the panel's functions.
Role Management
In the Admin panel of your store, go to Business > Roles at the bottom left in the main menu.

In the field that appears, all roles entered in the management of your store will be displayed.
For each role, there are several definitions:
- Role name
- Creation date
- Last Modified
- Actions
Changing the functions of team members in your online store
If you wish to add or restrict some of the rights of a role in the online store, this can be done in a few easy steps.
In the Actions field, click the edit button next to the role you want to change.
Several basic fields will be displayed:
-
Under Edit role, you can change the name of the respective role as well as the job description.
-
You can also enter the name of the respective user.
-
On the right side of the field, you can see the various functions that each role (each member of your web store's team) can have. To disable or add a specific function, simply check or uncheck the boxes next to the corresponding activity.
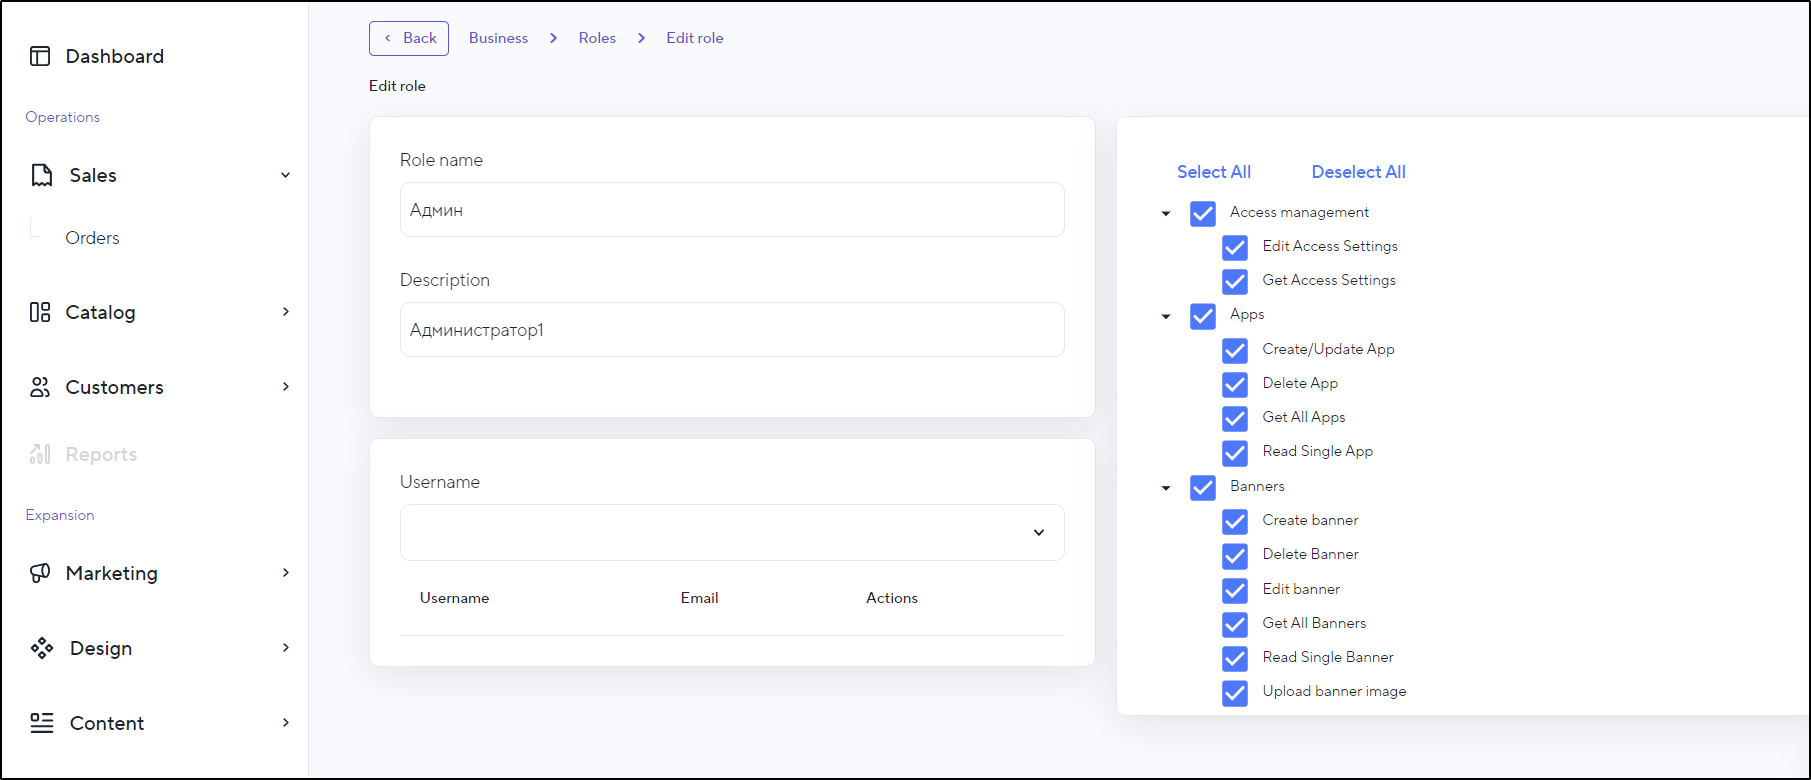
- If you make any changes, a Save button will appear on the right side of the tab. Hit it to save any changes.
